Sync or Download Code
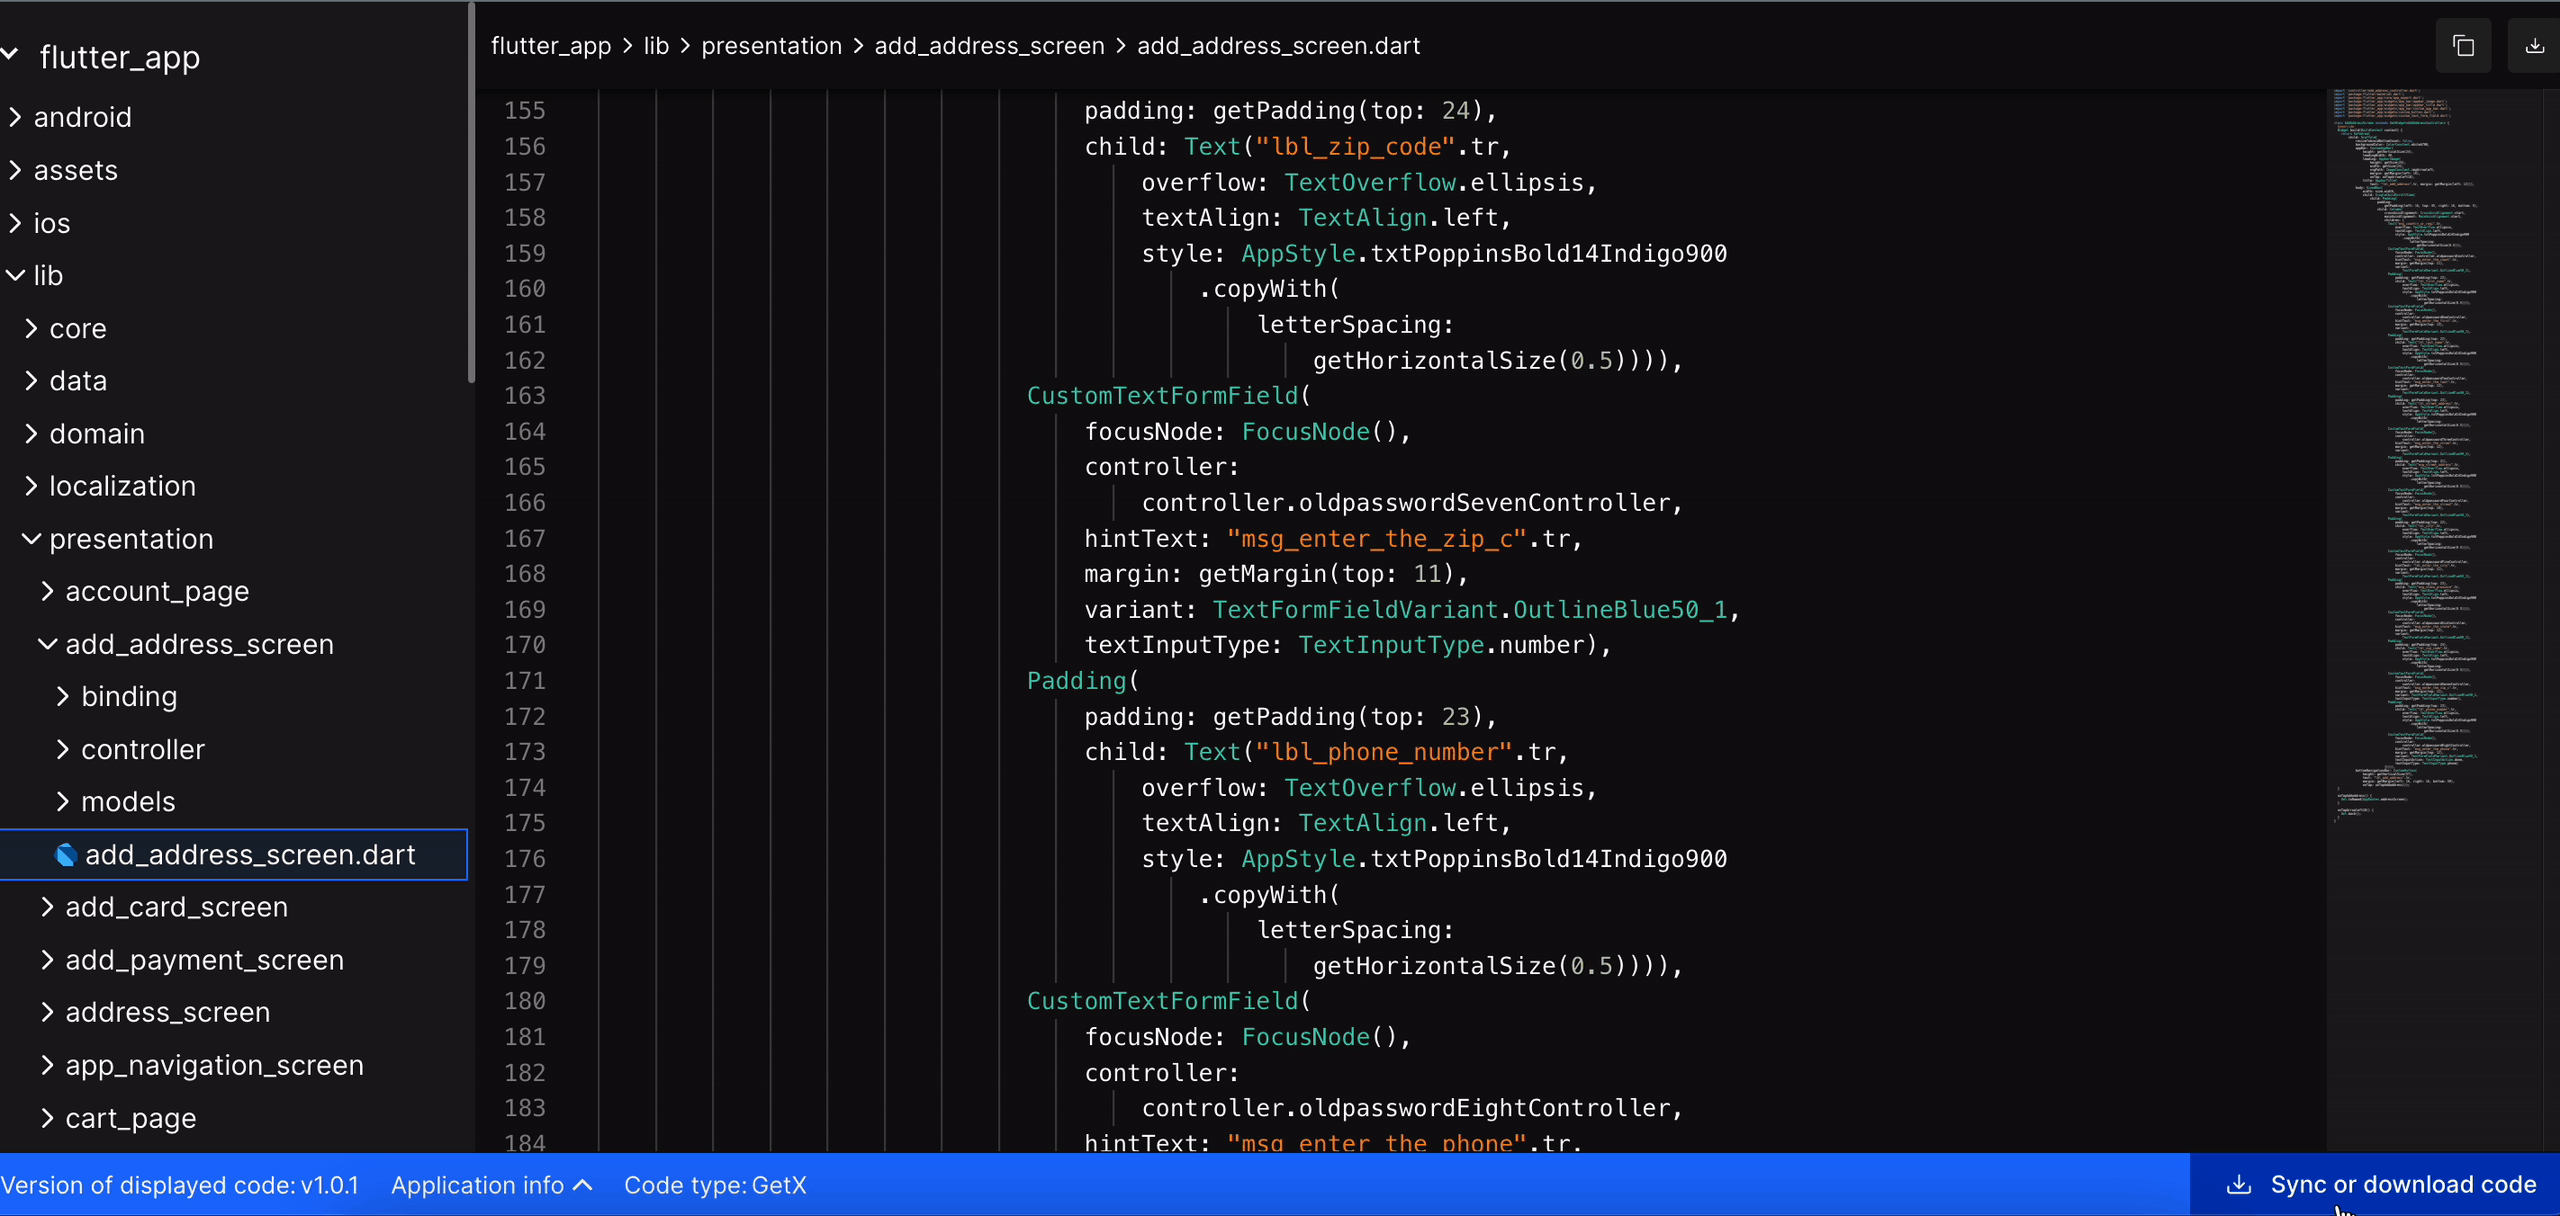
As you build your application, you will be redirected to the </> Code view screen, where you will find your generated app code or click on </> Code view on the top to visit the same.
Flutter app code would be generated with the latest Flutter 3.7 version.
Here, you can view the Version of displayed code, Application info, and Code type(which shows the chosen state management). Also, you can Download a single file or Copy to clipboard from the top right corner of the code view screen.
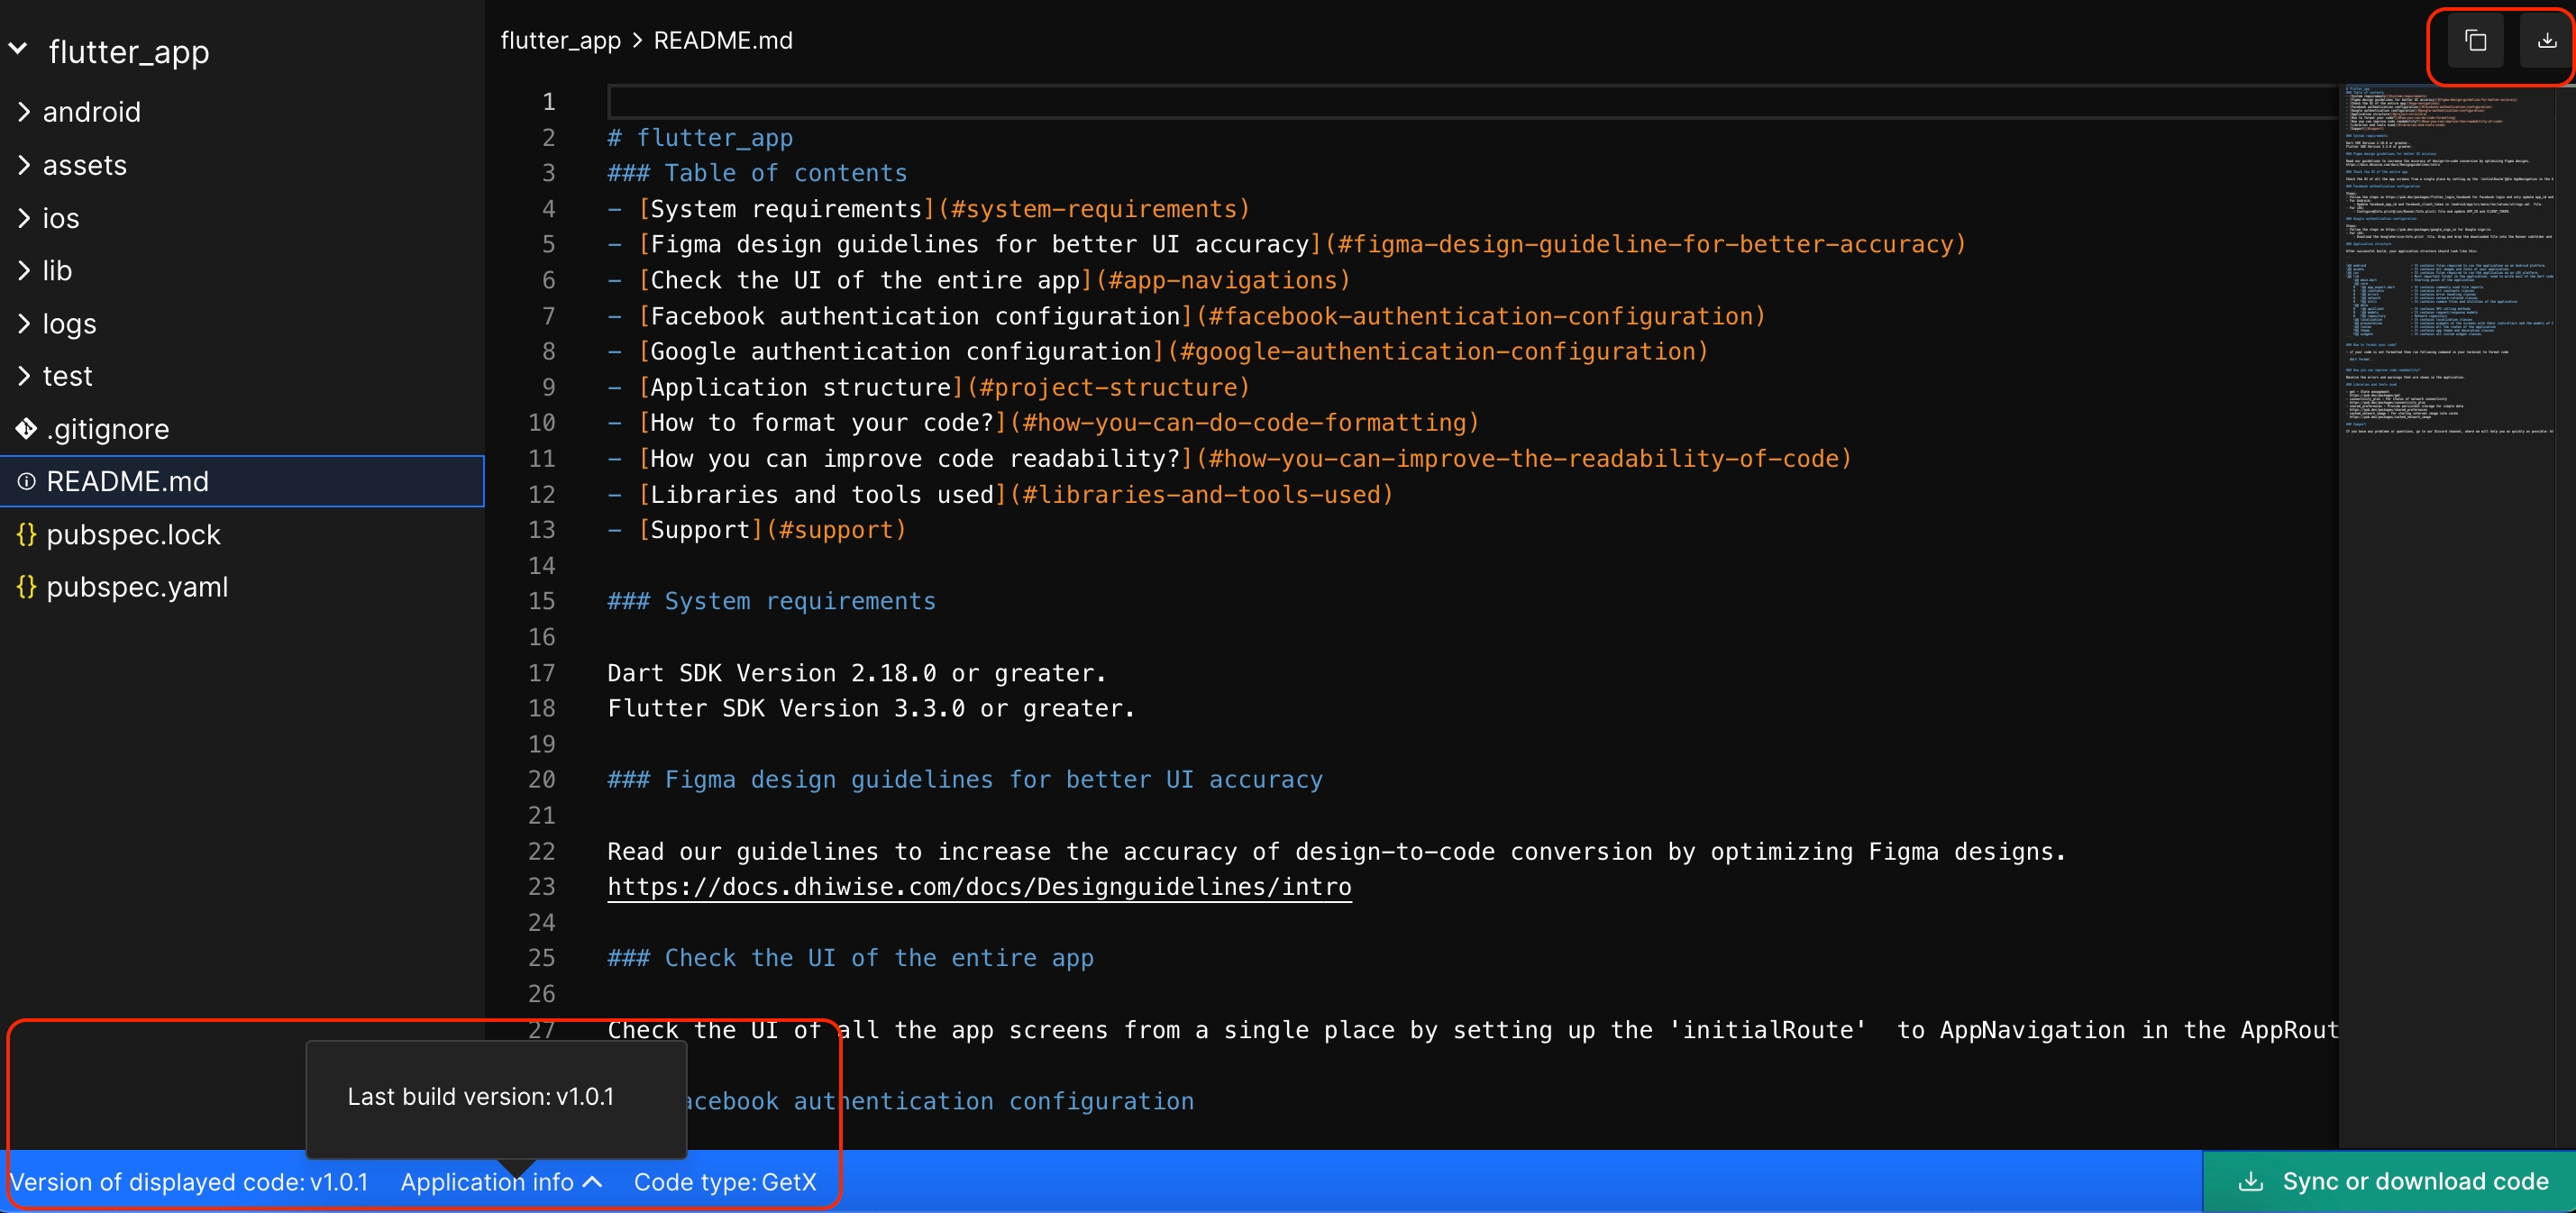
It is recommended to check the README.md file, which consists of the following app information:
- App Details
- SDK Versions
- Prerequisites
- Dependent libraries
- Project structure
- Font assets
With our platform, you can create and preview your app for free. To download the code or sync code to GitHub/GitLab, upgrade to one of our paid plans.
Free Plan:
Live Preview: View a live preview of your app. (Build the app to check the live preview; it's the preview generated from executable code. Compare it with your Figma design or templates to check the design accuracy.)
Code Access: Review the code to ensure it meets your expectations. (Check folder structure and code quality)
Paid Plan:
Download Source Code: Access and download the complete source code.
Figma Plugin Integration: Build your app using the Figma plugin and download the source code from DhiWise platform.
VS Code Plugin Sync: Sync and manage your code effortlessly using the VS Code plugin.
Start by using the free plan to explore the features, and then upgrade to the paid plan to download/sync the code and take full ownership of your code and app.
Download as a ZIP file
Download the application as a ZIP file into your system, and get your hands on it easily.
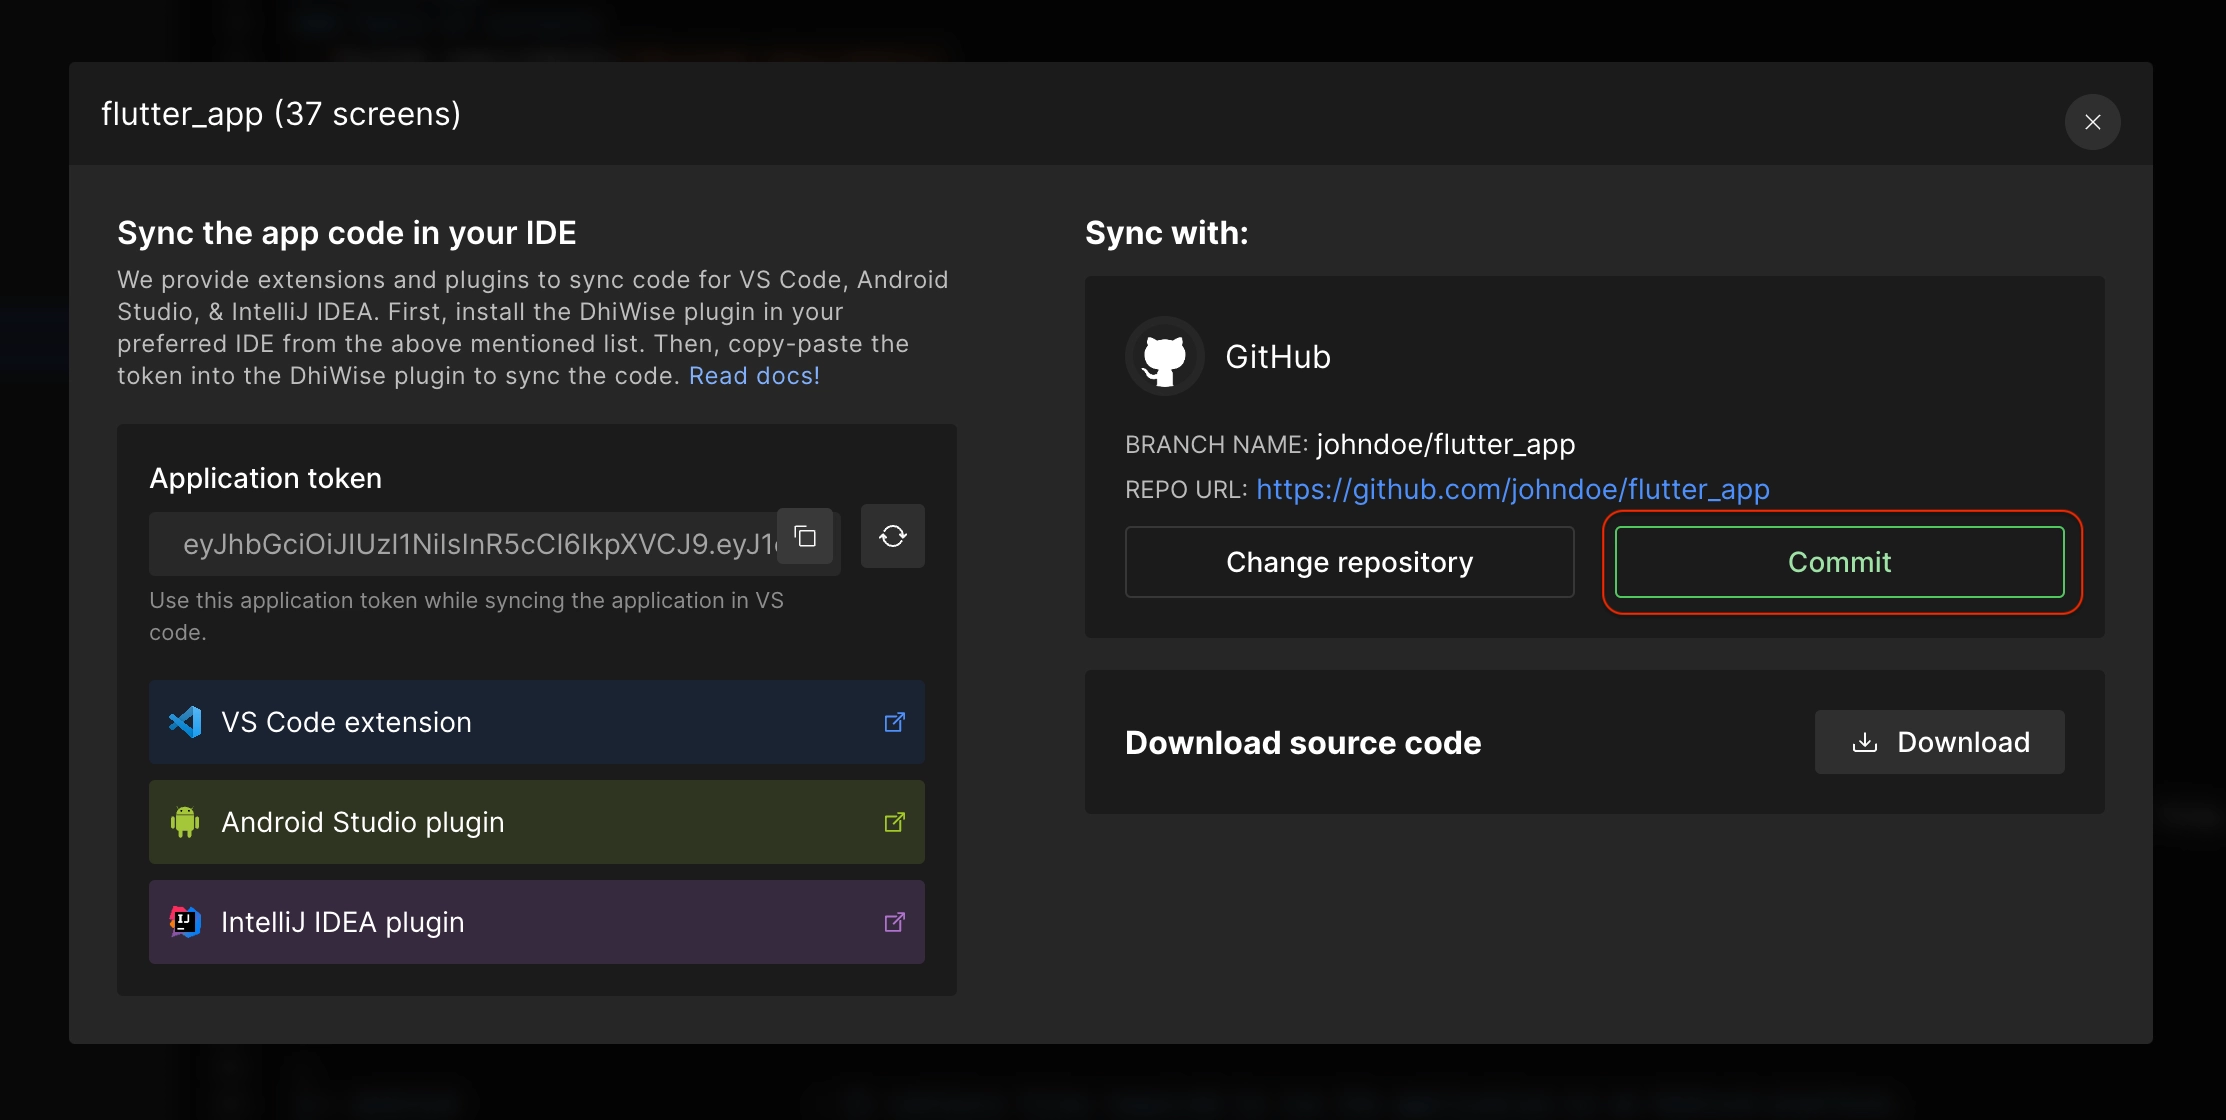
Click on Sync or download code button at the bottom-right of the </> Code view screen. It will open a popup. Click on Download to download the ZIP file.
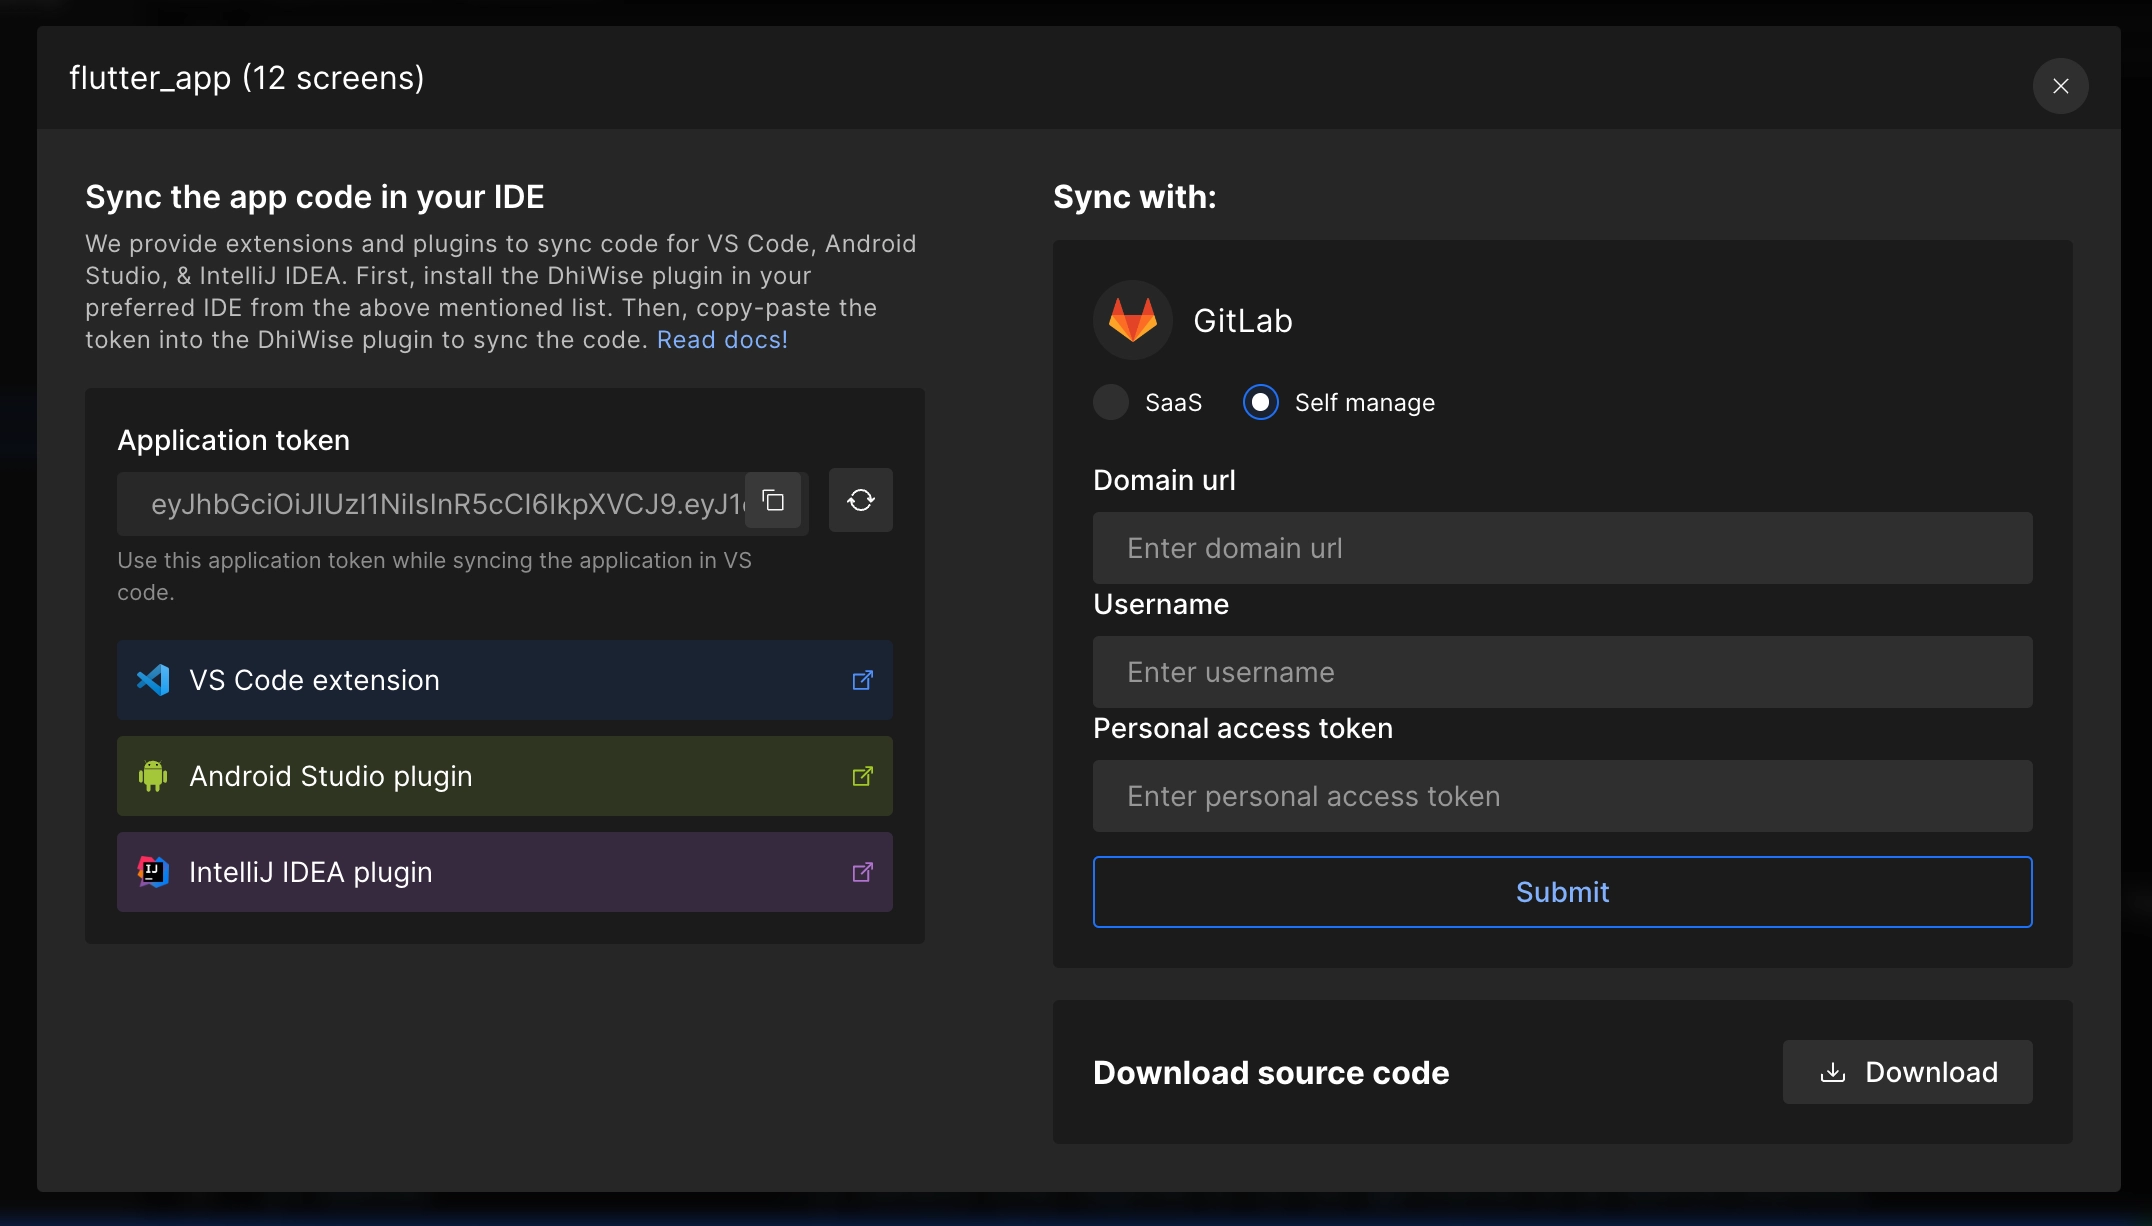
Sync app code to IDEs
You can also sync the generated app code into your desired IDEs like Visual Studio Code, Android Studio or IntelliJ.
Copy the application token, for the VS Code extension to fetch the code in VS Code.
Use DhiWise Android Studio/IntelliJ plugin to sync the generated code into the respective IDEs. Learn more.
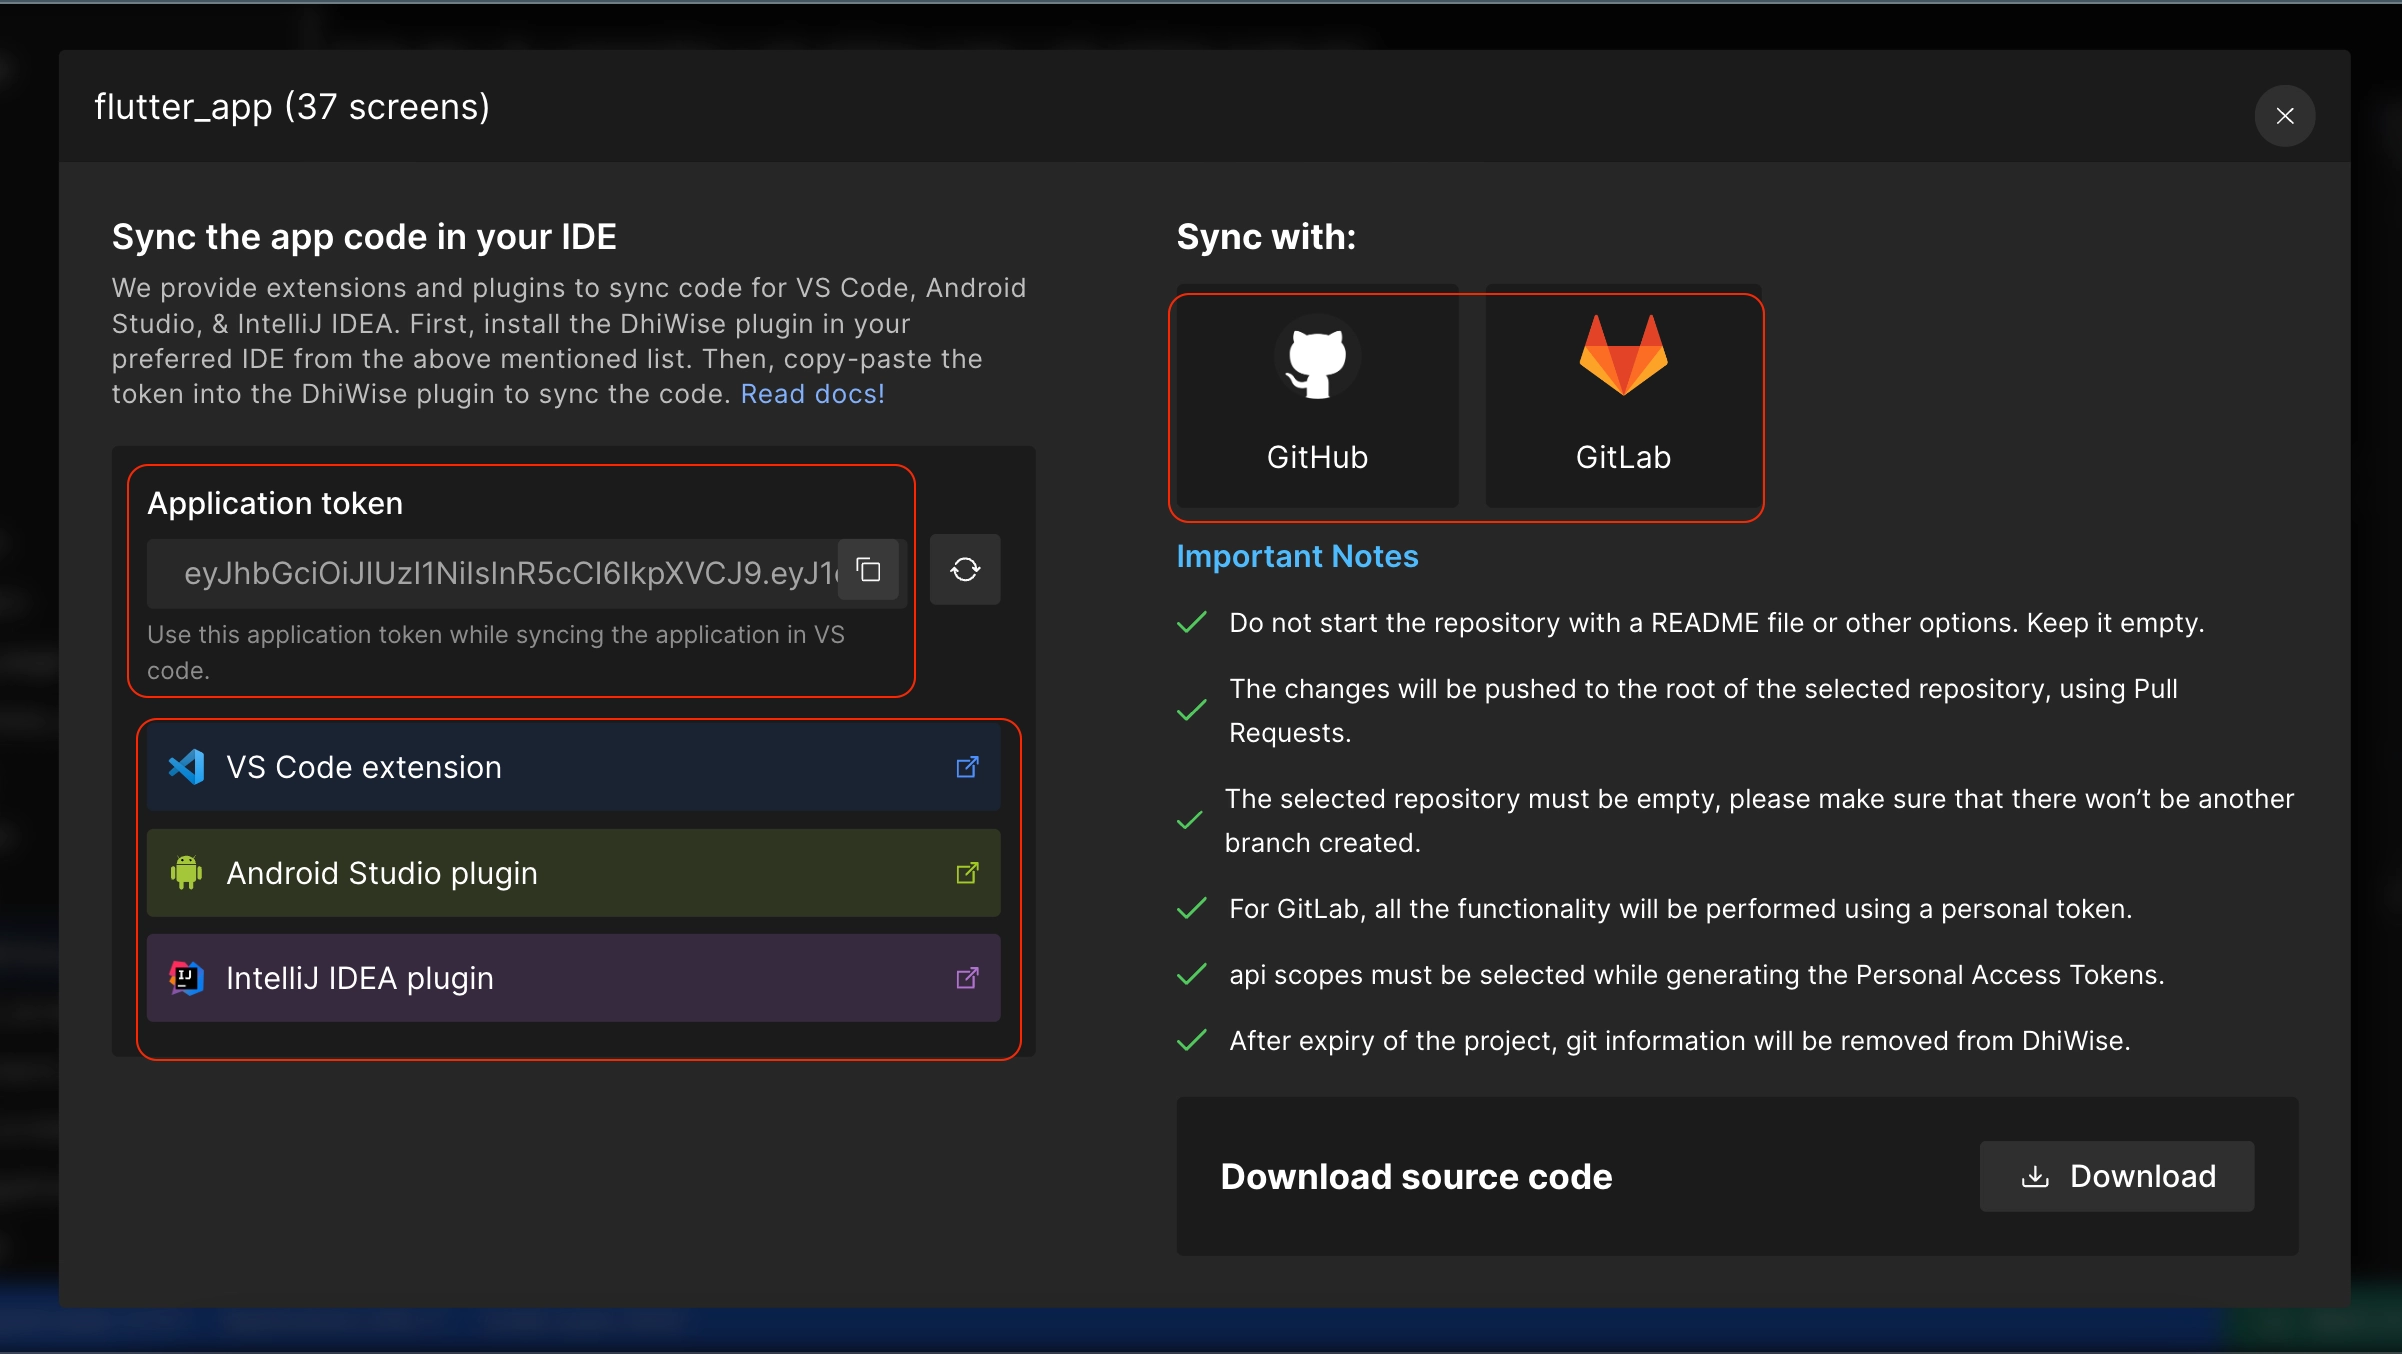
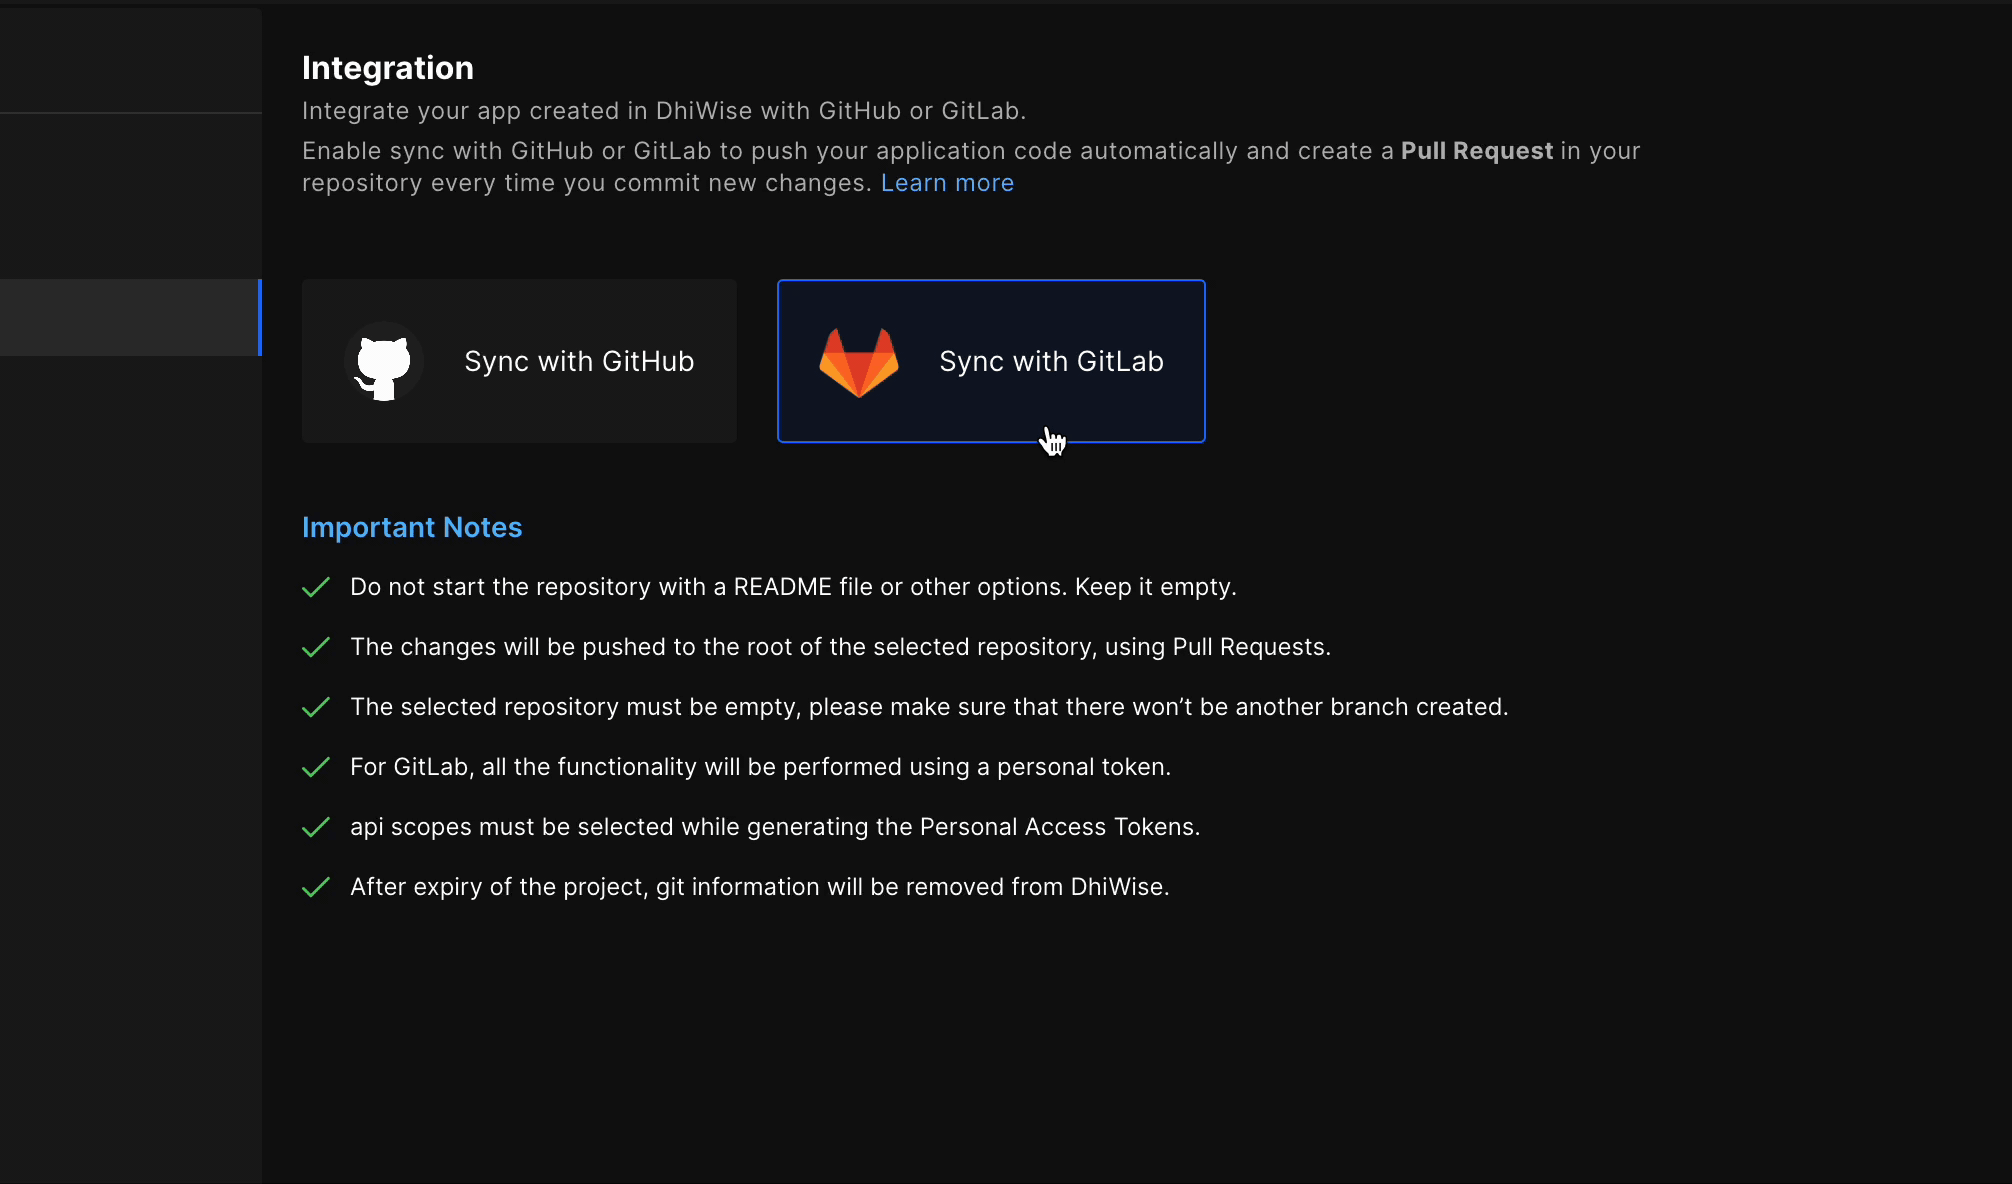
Sync app code to GitHub
Connect DhiWise with your GitHub account and push the generated application code to your GitHub repository.
Follow the steps below to integrate GitHub in DhiWise:
Step 1: Select GitHub integration
You can integrate GitHub using two options:
From Settings: From the
Settingsicon selectIntegrationsunderApplication settings, and click onSync with GitHuboption.
From Sync or download code: On the bottom-right of the
</> Code viewscreen, click onSync or download code. It will open a popup where you can select theGitHuboption.
Step 2: Authorize GitHub with DhiWise
As you click on the GitHub option, it will ask you to sign in to GitHub to connect your account with DhiWise.
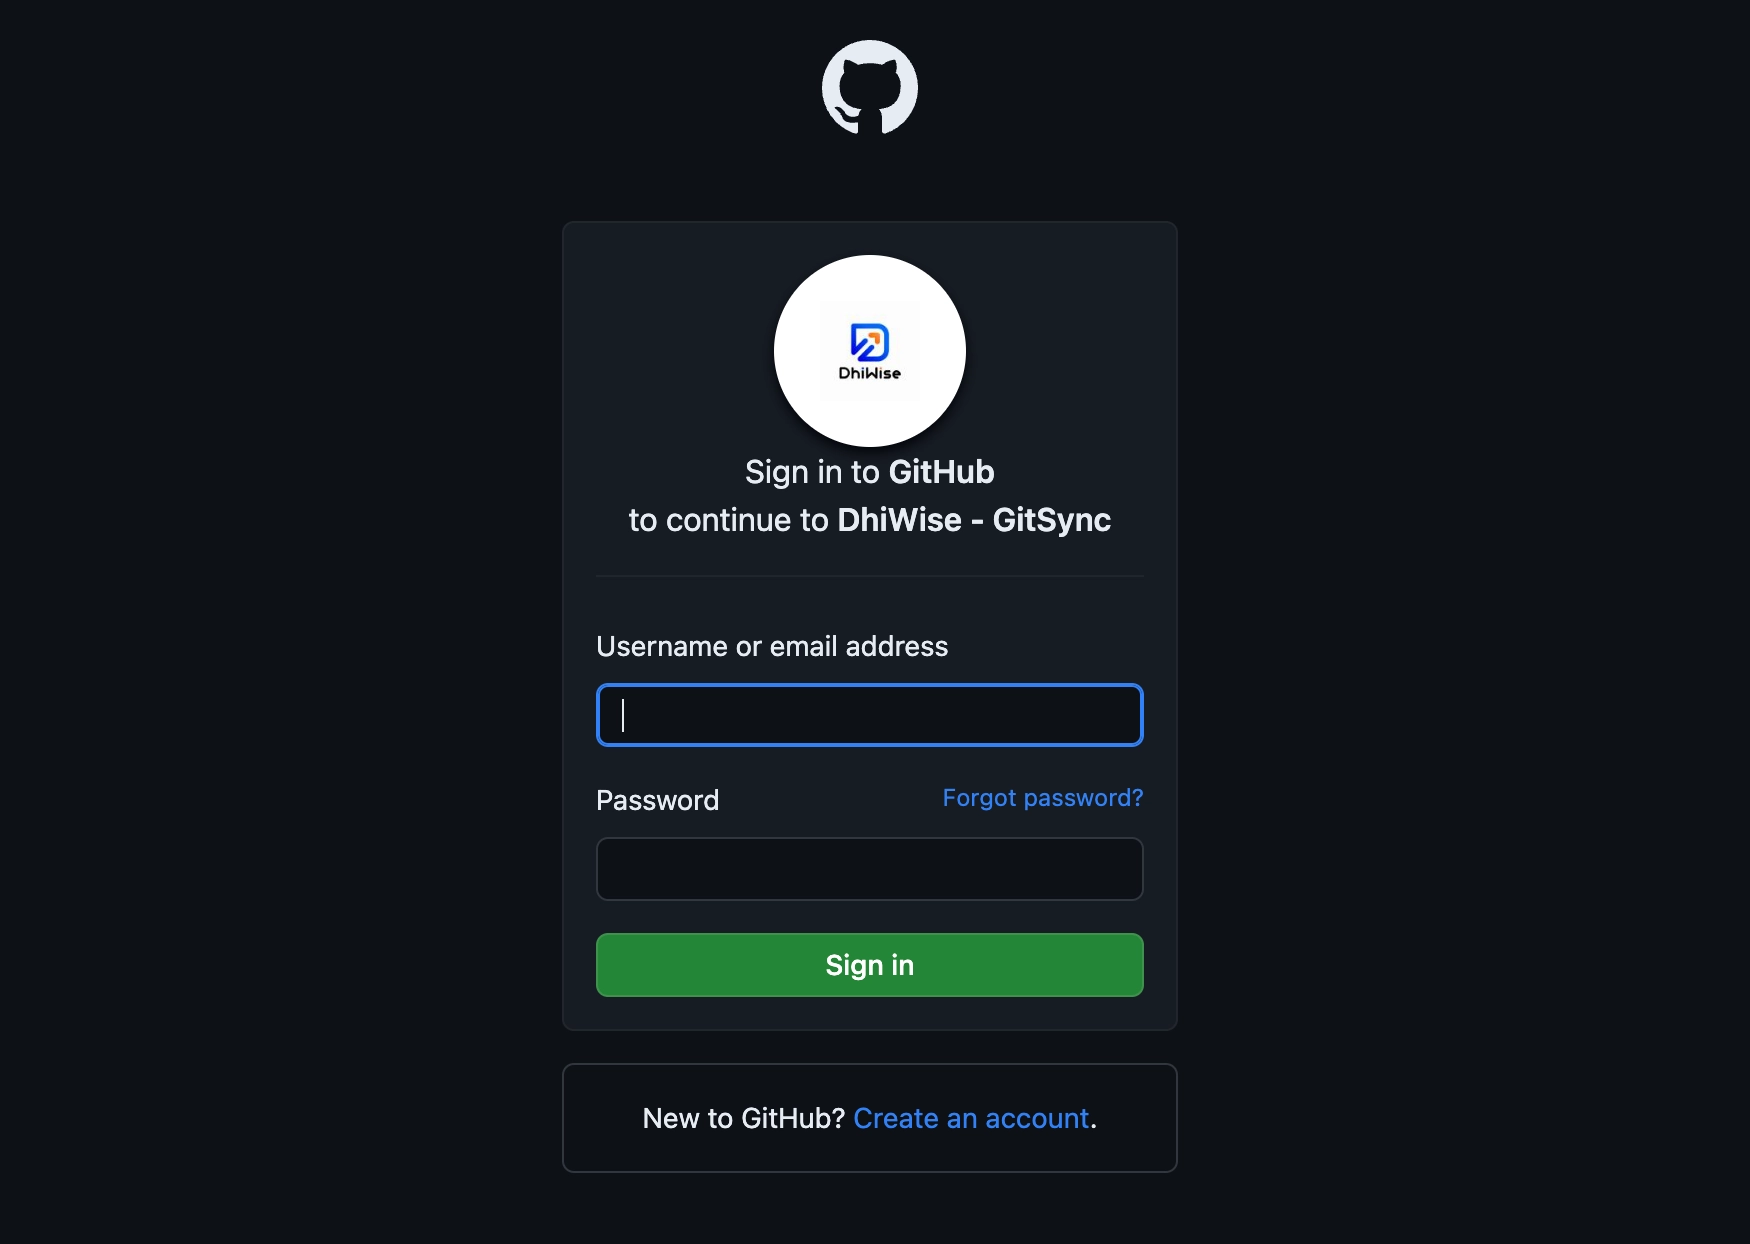
Next, confirm the access and authorize with DhiWise to sync the code to your connected GitHub account.
Step 3: Connect a Git repository
Now, your account is synced with DhiWise. Click on Select Git repository to select a repository from your account to which you want to add the generated code.

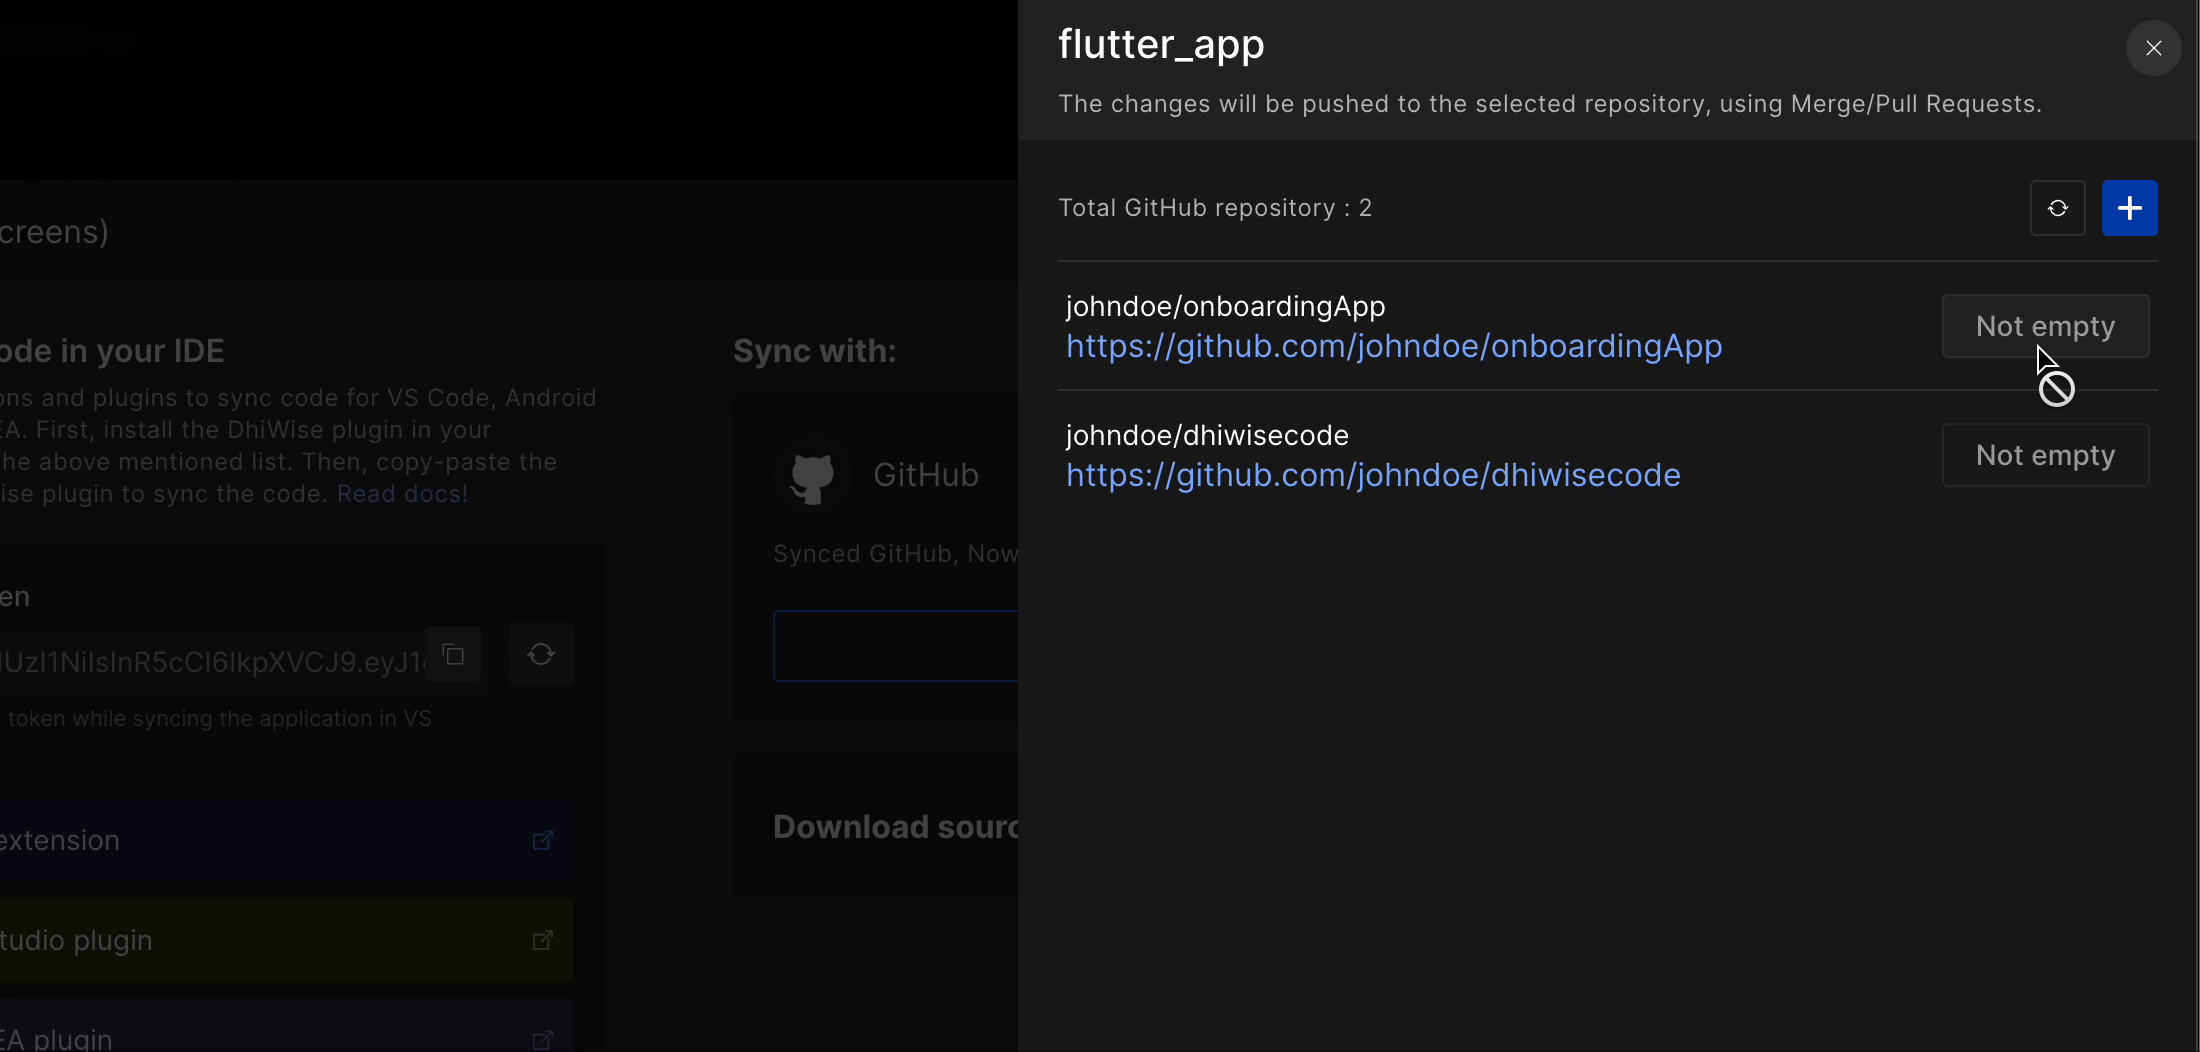
Select a repository
A menu will show up where you can view all your existing repositories.
You can only sync code to an "empty repository".
If you have an empty repository click on Select to proceed with it or add repository using ➕. Use 🔄 to refresh the list of repositories.
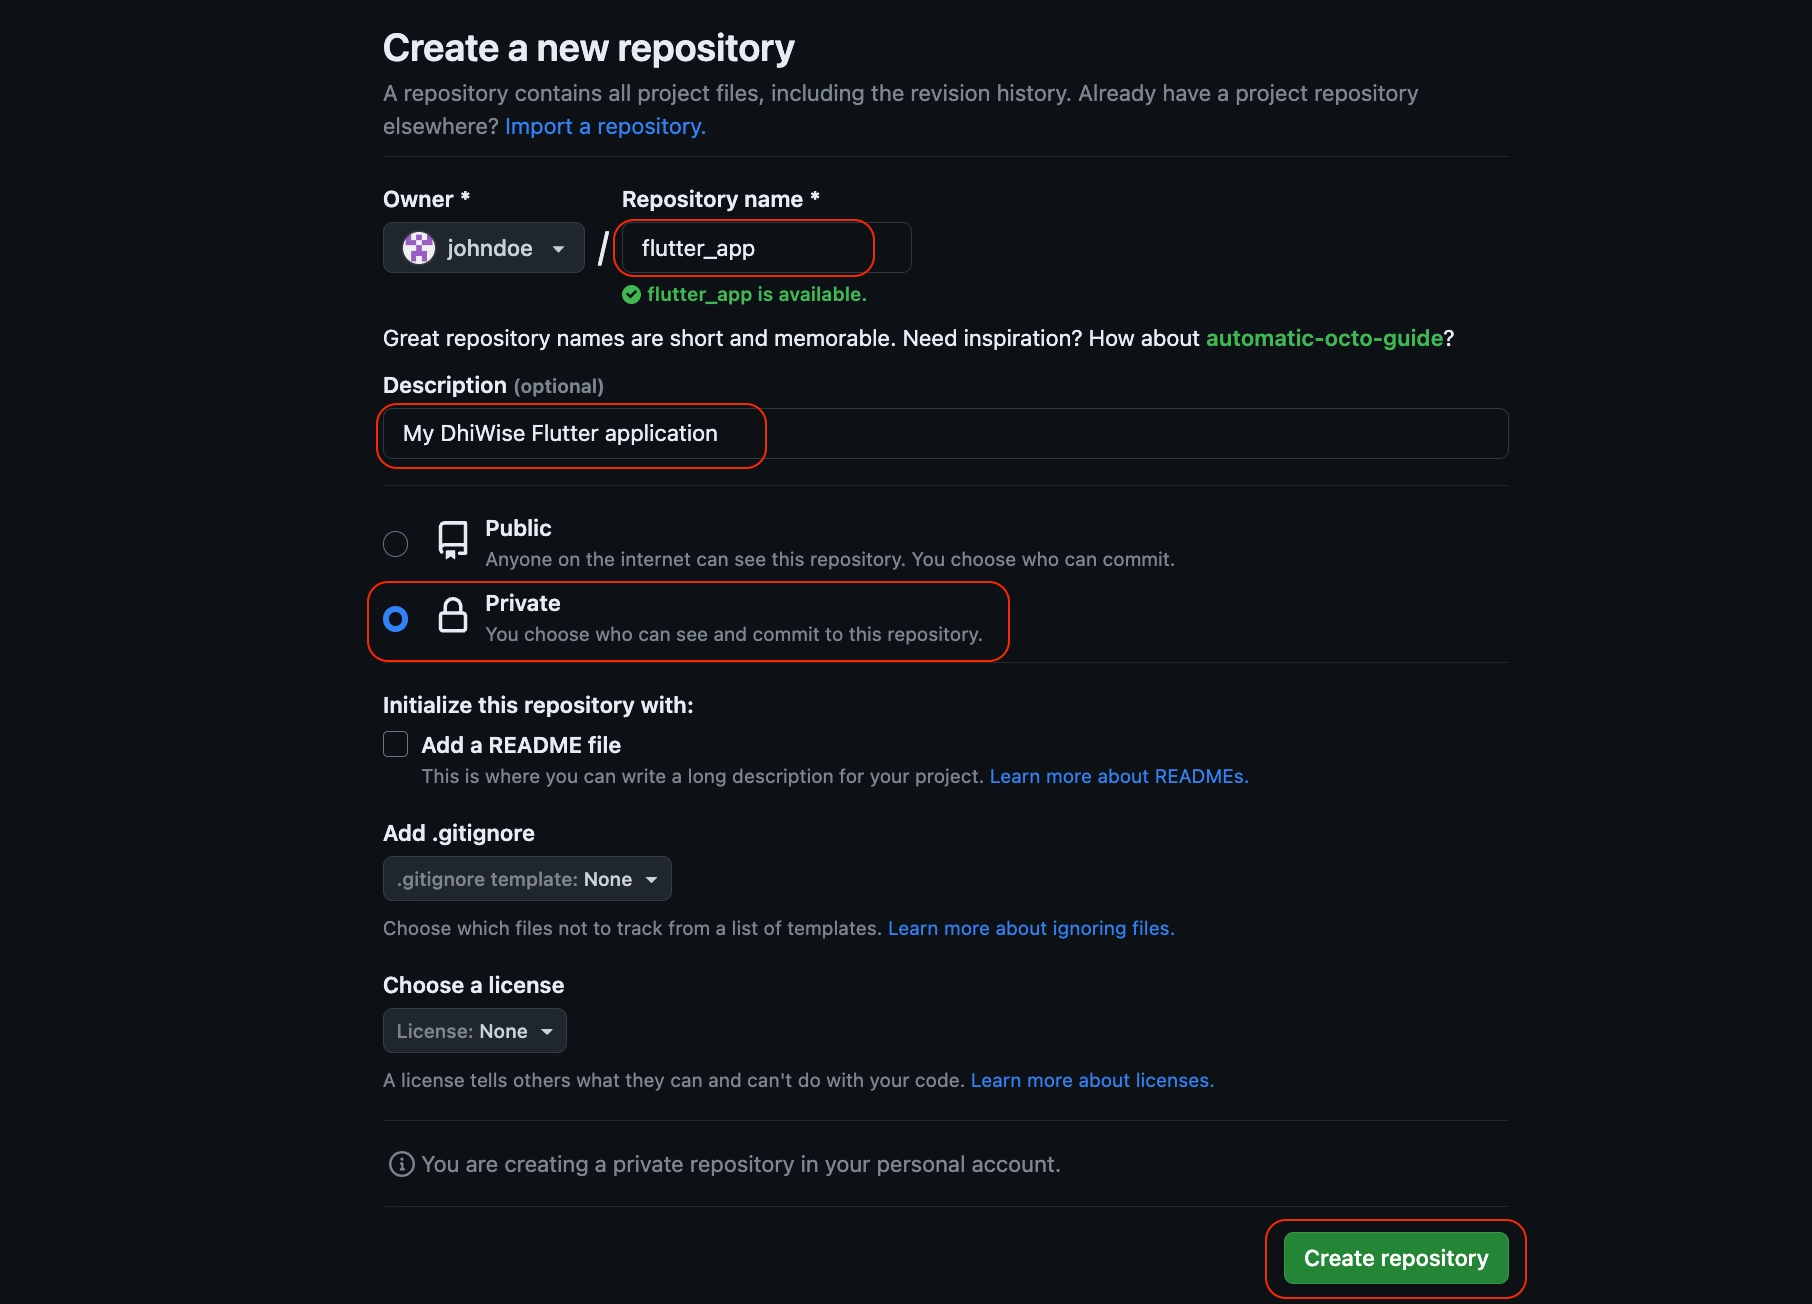
Add a new repository
Click on ➕ icon it will redirect you to your GitHub’s create a new repository page. Enter a repository name and add a suitable description. We recommend creating a private repository. DhiWise generates a README file so no need to initialize it. Click on Create repository.
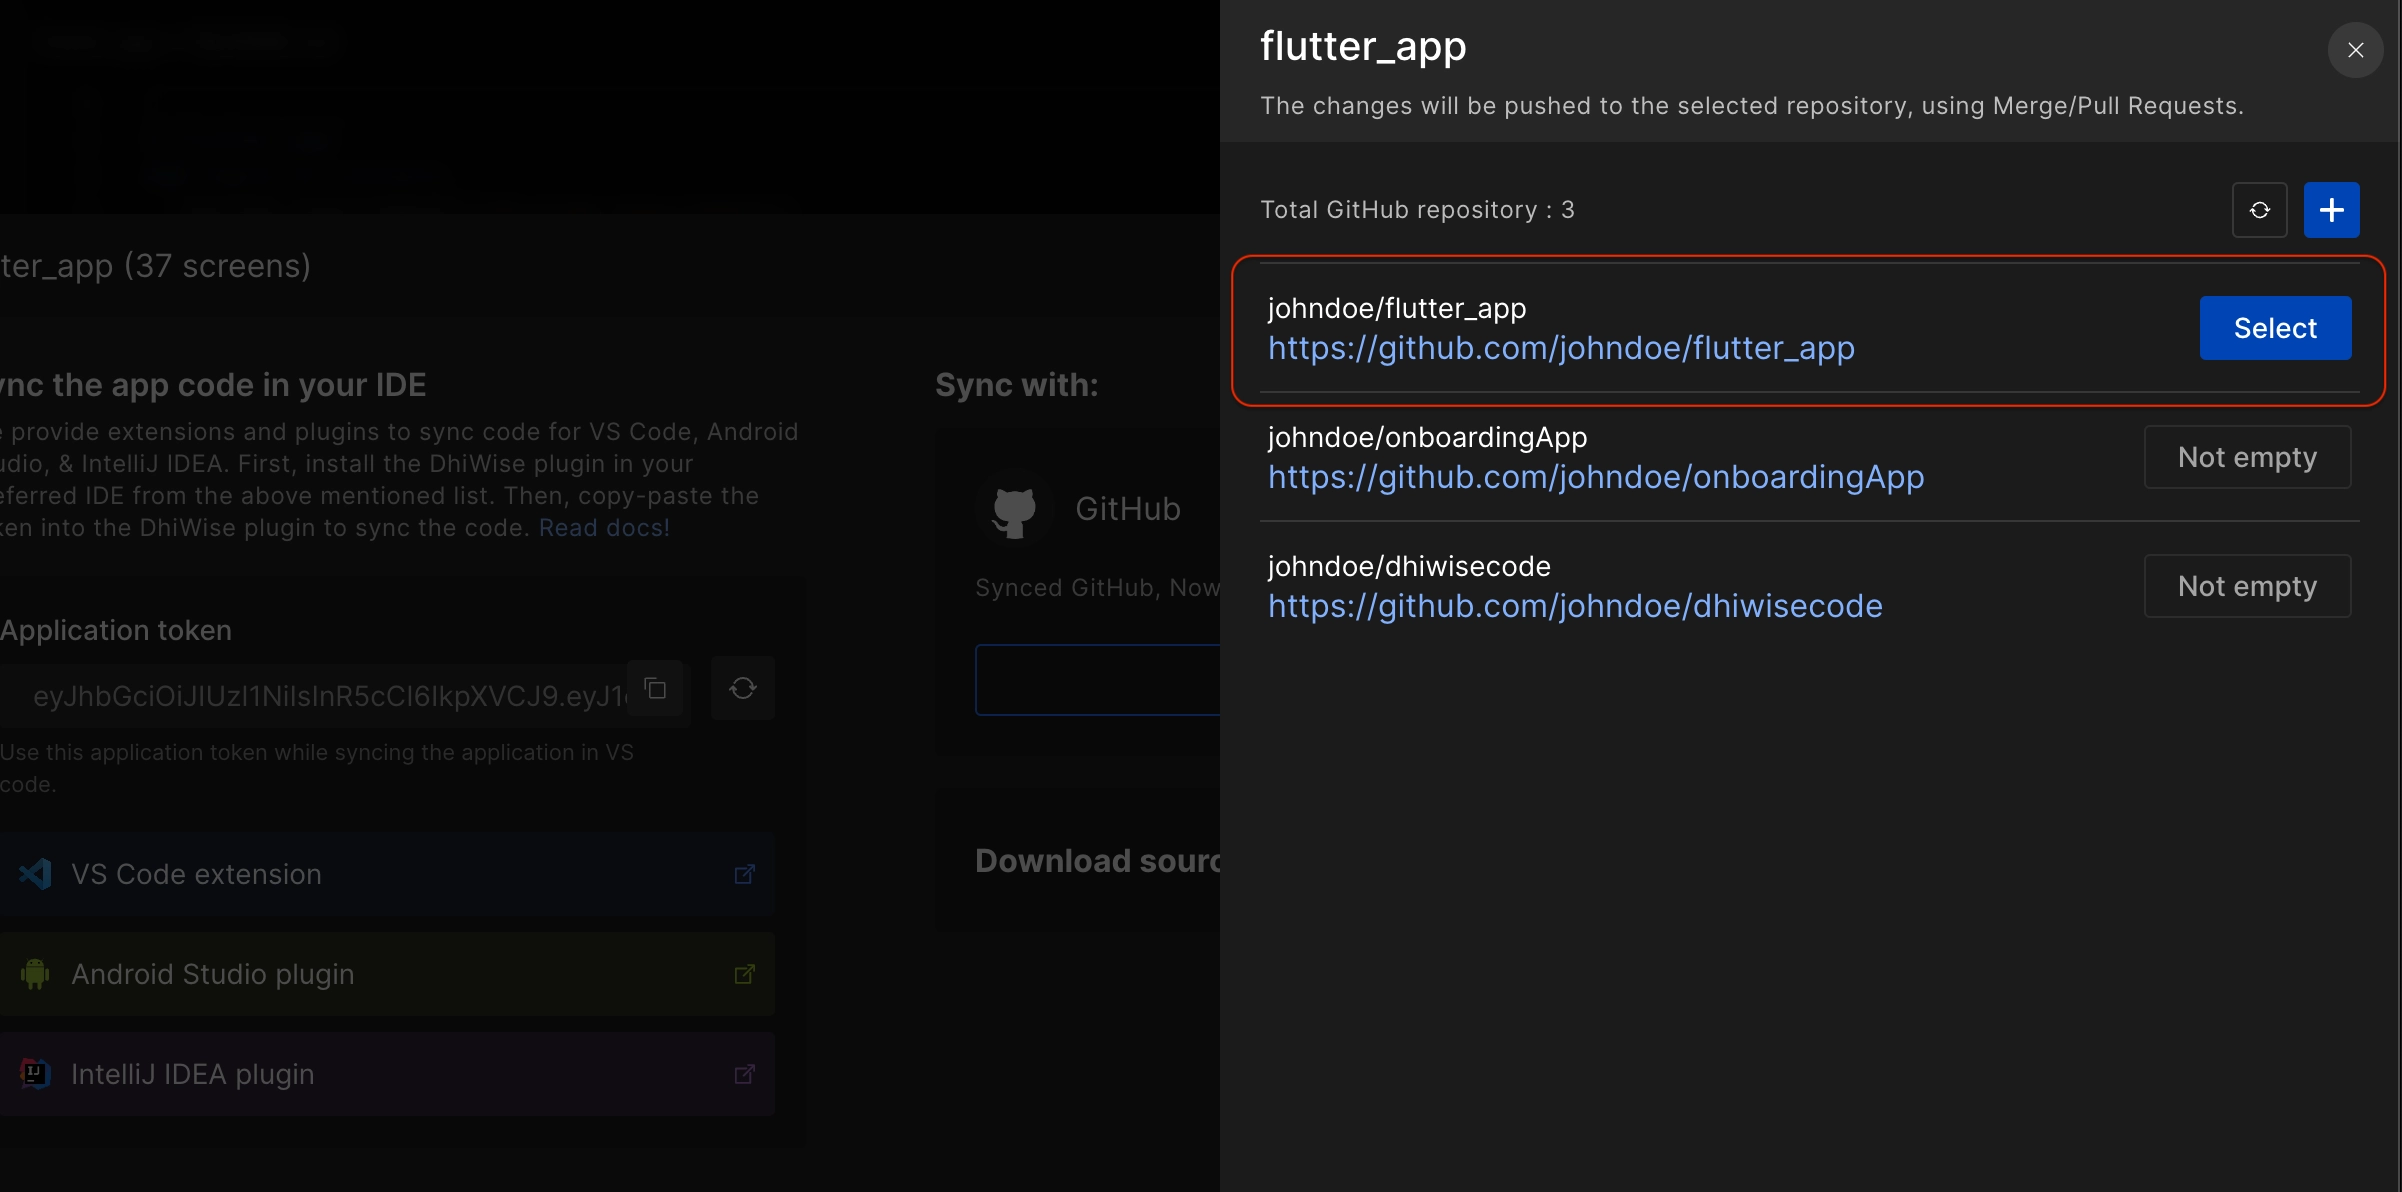
Once the repository is created, go back to DhiWise and refresh 🔄 the menu to select the created repository. Click on Select.
Step 4: Commit code to the repository
Confirm the selected repository details. Click on Change repository to change the selected one else click on Commit to push the entire application codebase to the repository.
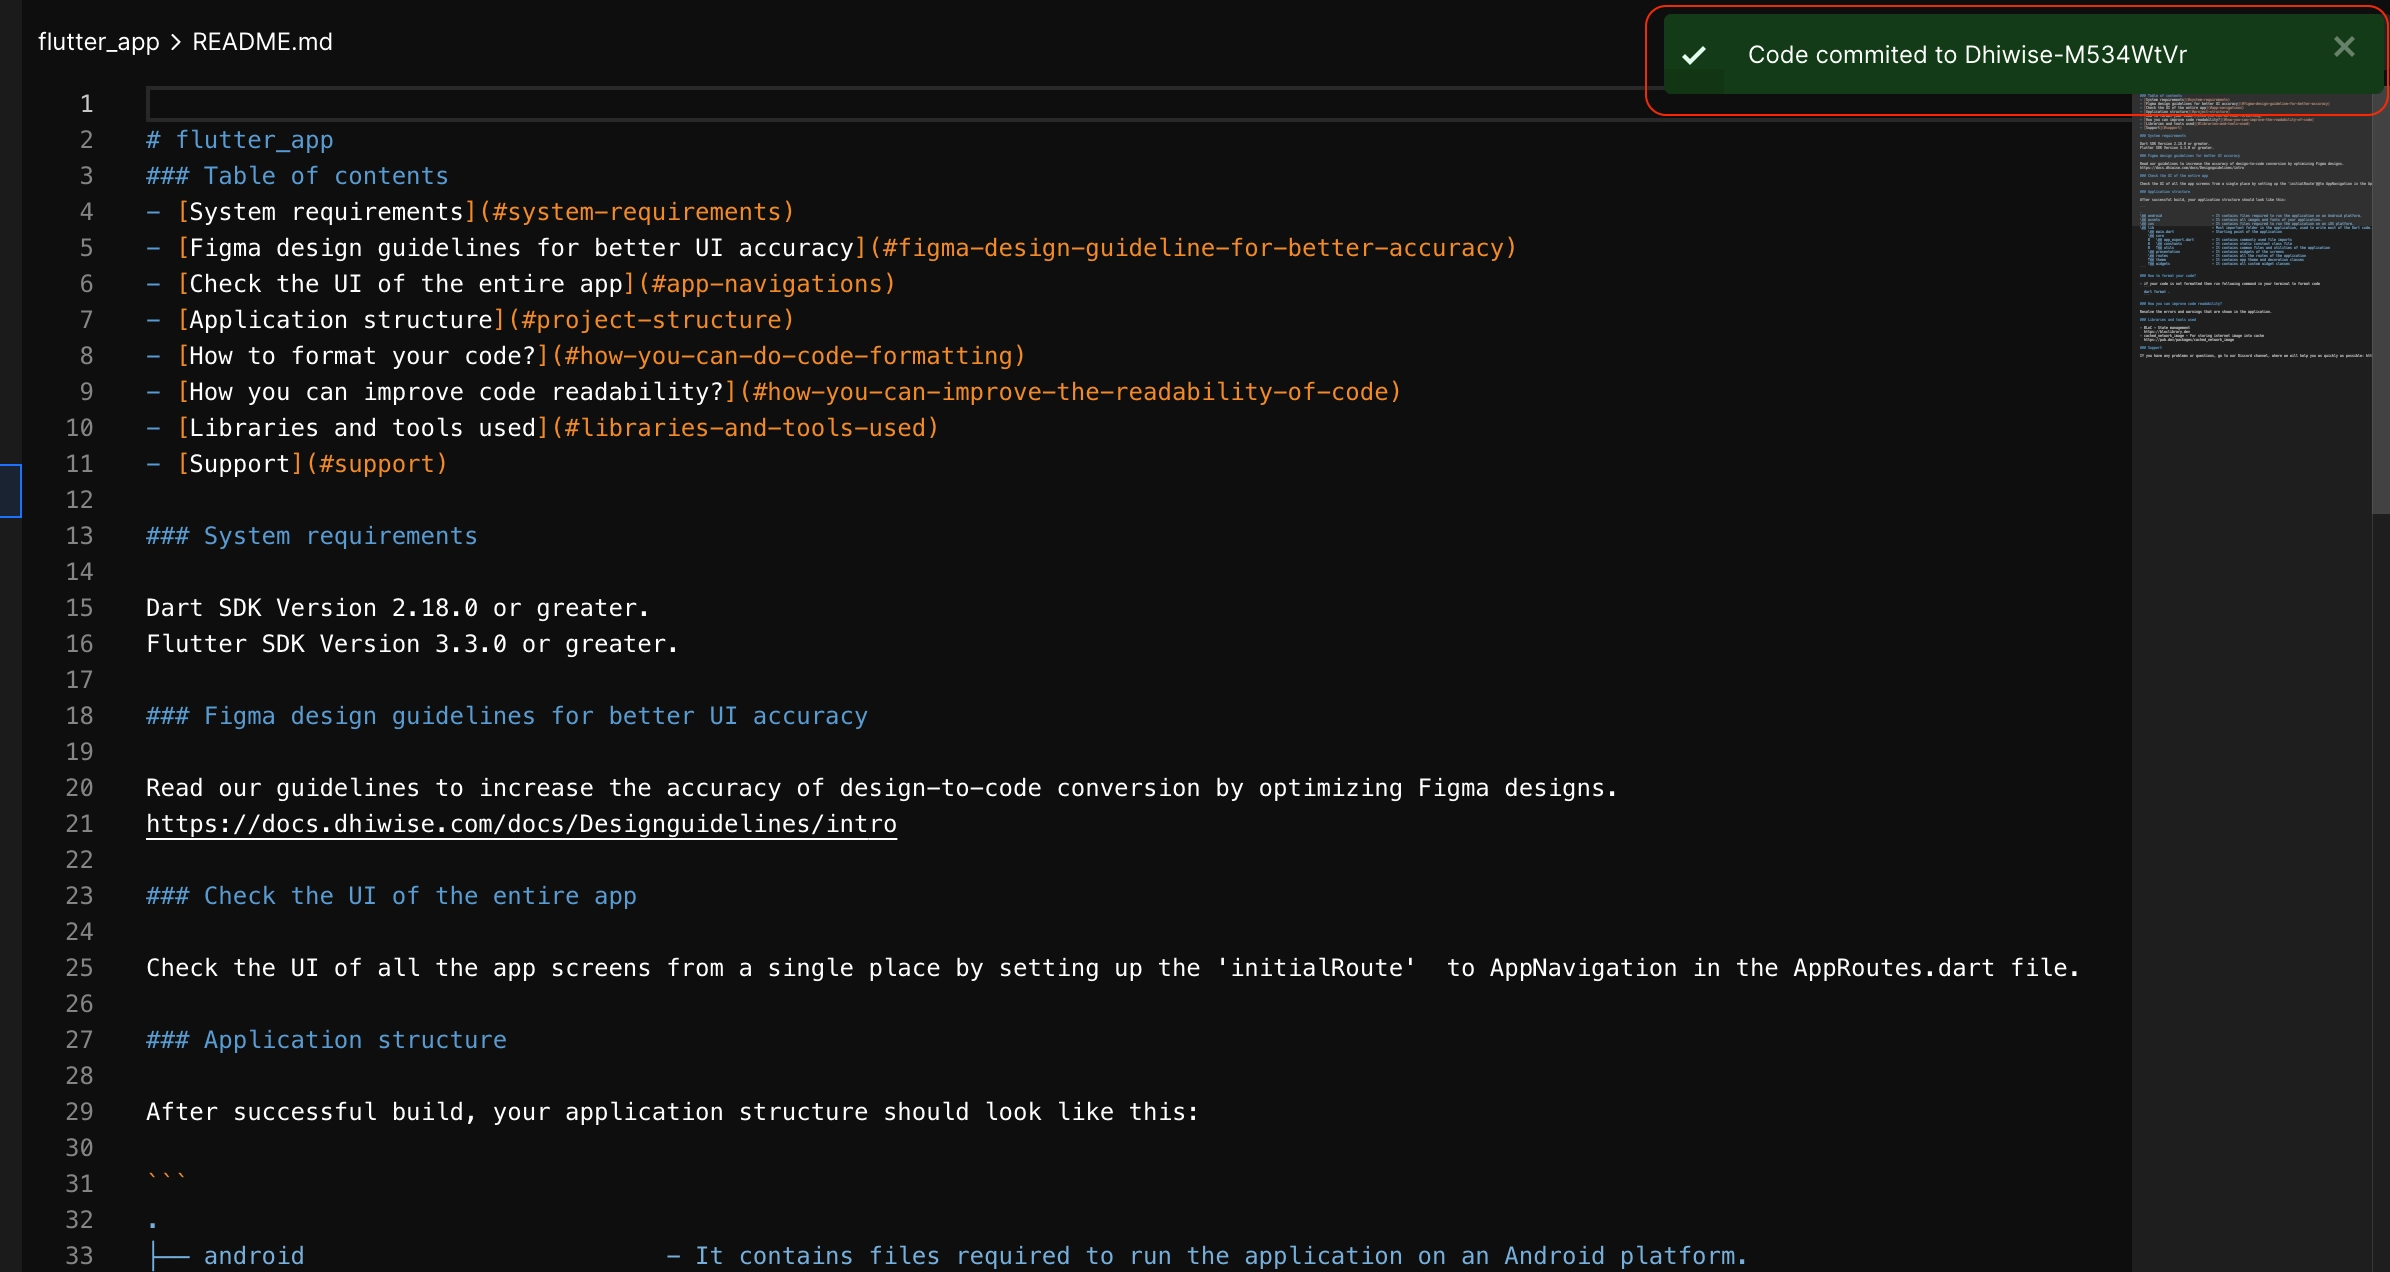
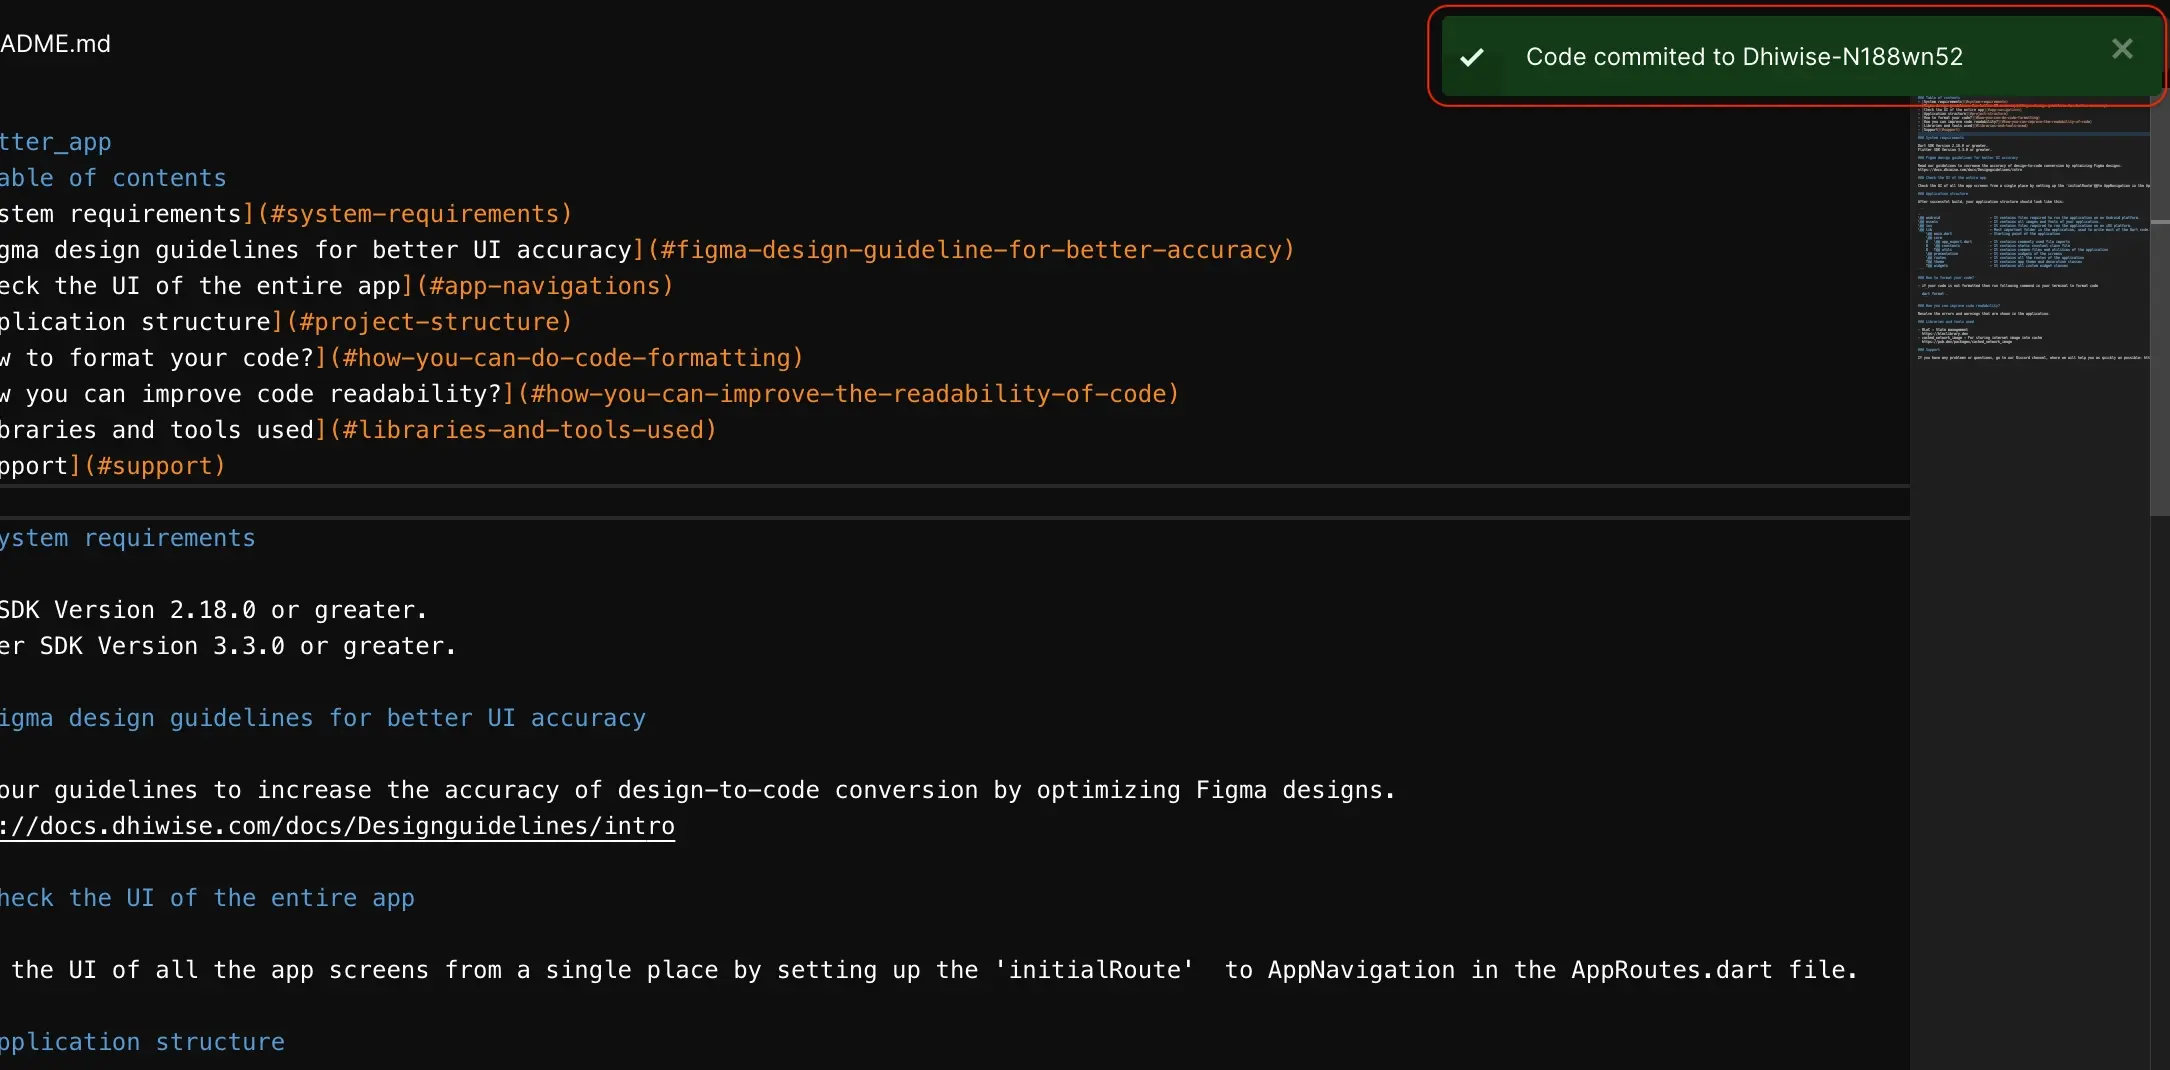
As your code is successfully committed, a snack bar will appear with a branch name where the entire code is committed. Note that branch name. DhiWise pushes your code to a new branch with "DhiWise" as a prefix.
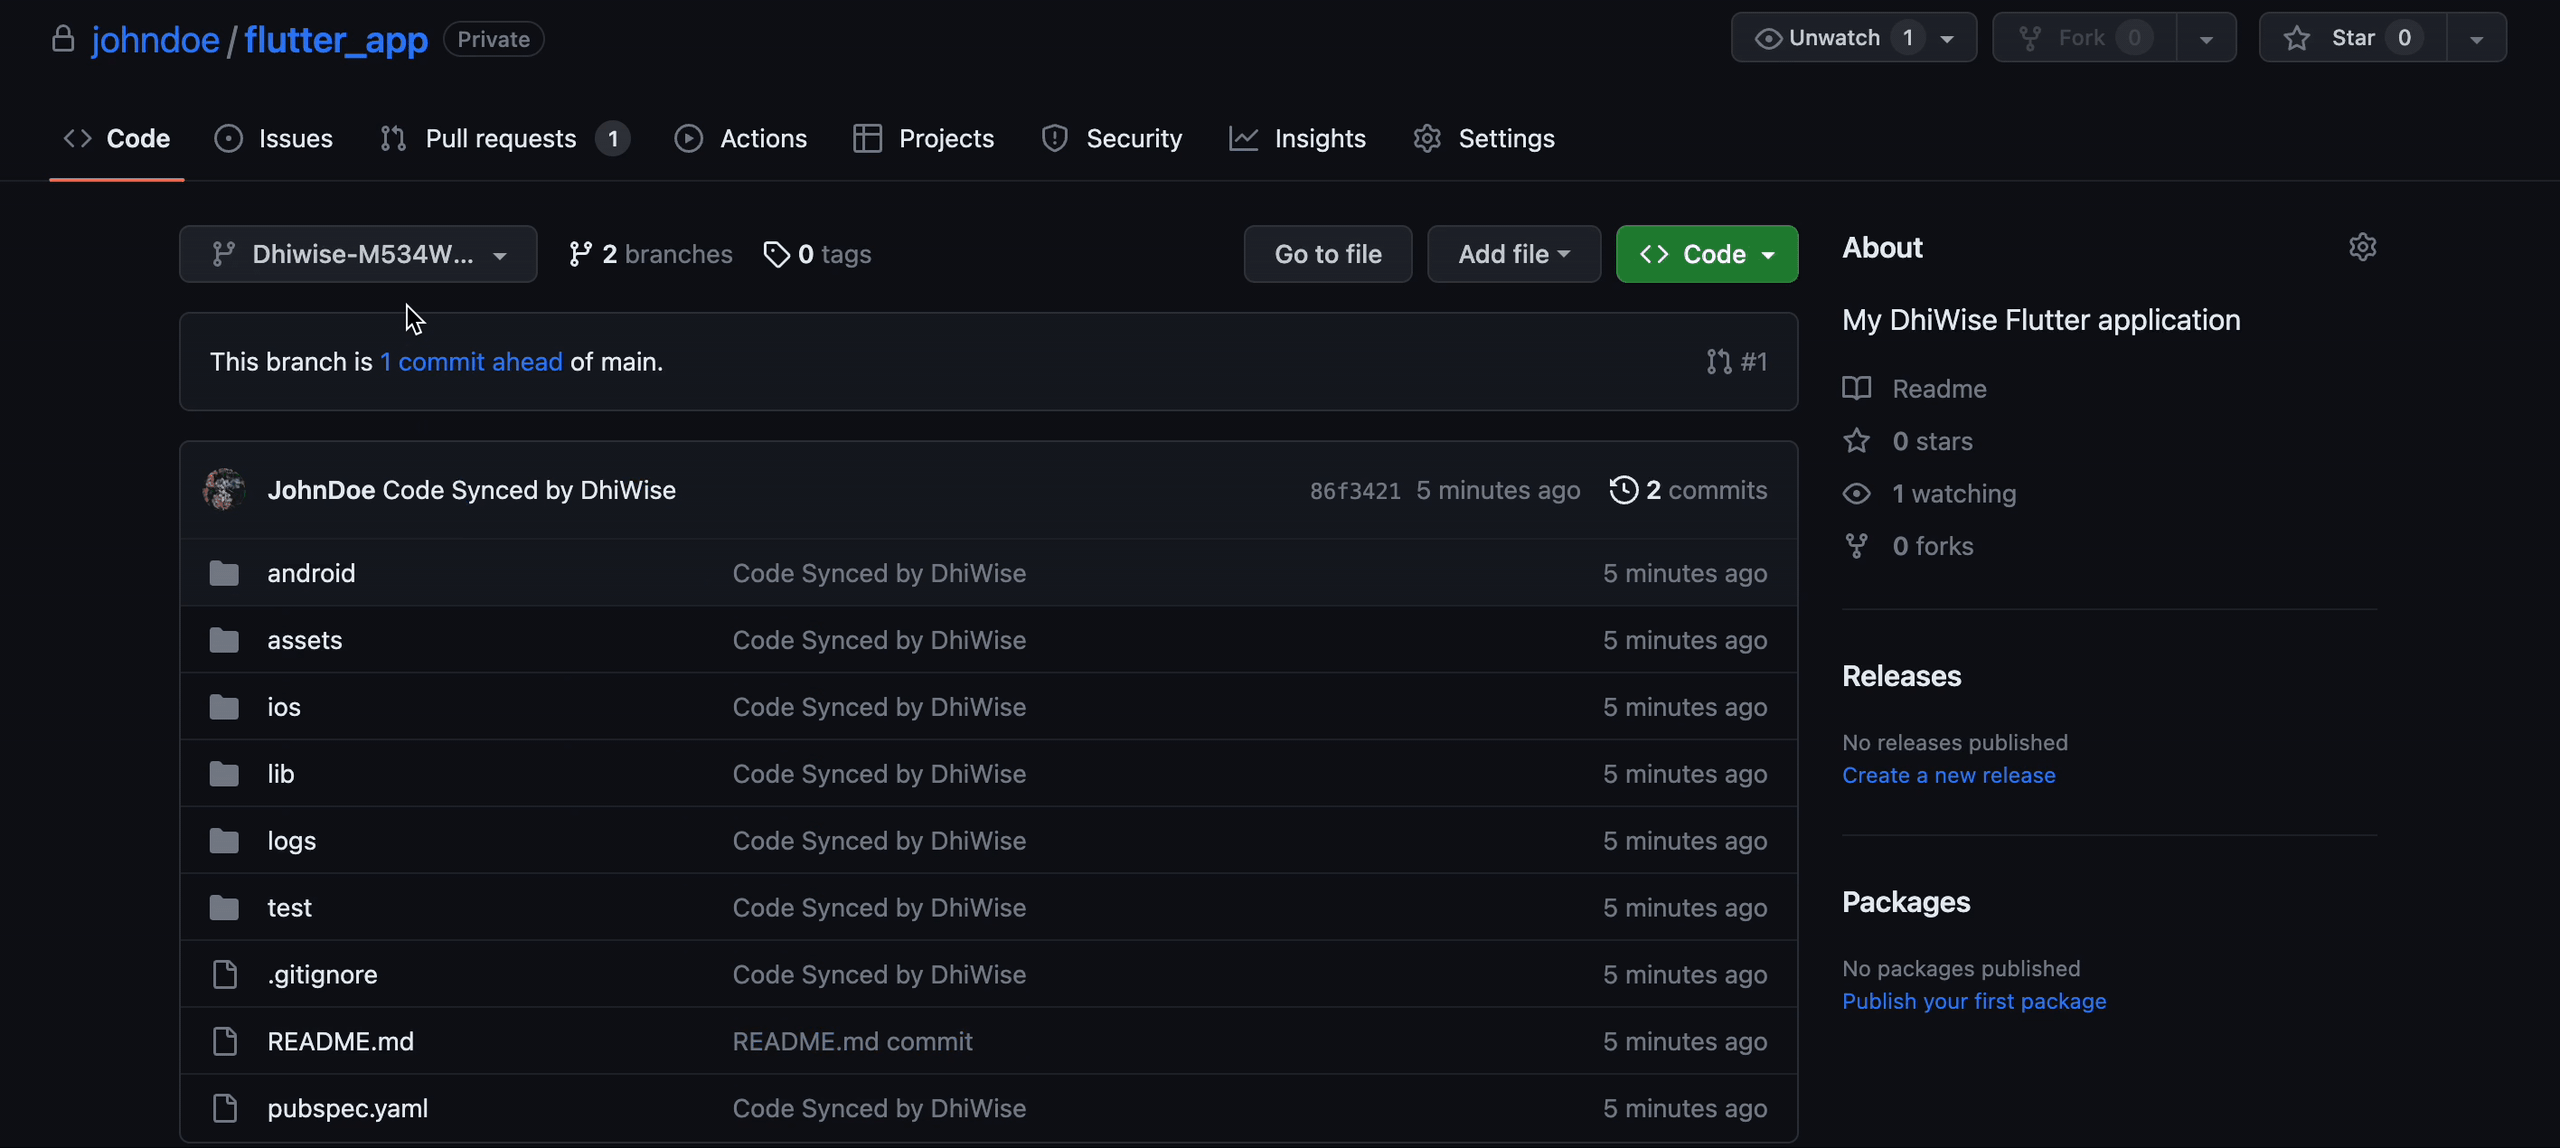
Here you complete your code sync process. Now, go to your GitHub repository and switch to the noted "DhiWise" branch. There you will find your entire synced code.
Push new changes from DhiWise
When you again push new changes to the present repository, below are some tips to be aware of:
- Whenever you commit your new changes, DhiWise pushes it to a new branch with "DhiWise" as a prefix.
- The changes are pushed to the repository using a pull request made to the main branch.
- We recommend merging the first time synced DhiWise branch to a new branch(e.g. develop branch), so it becomes easy for you to merge the upcoming branches and maintain your code.
Now, when you make any changes to your app in DhiWise and build an app, follow the same process to commit and push your new changes.
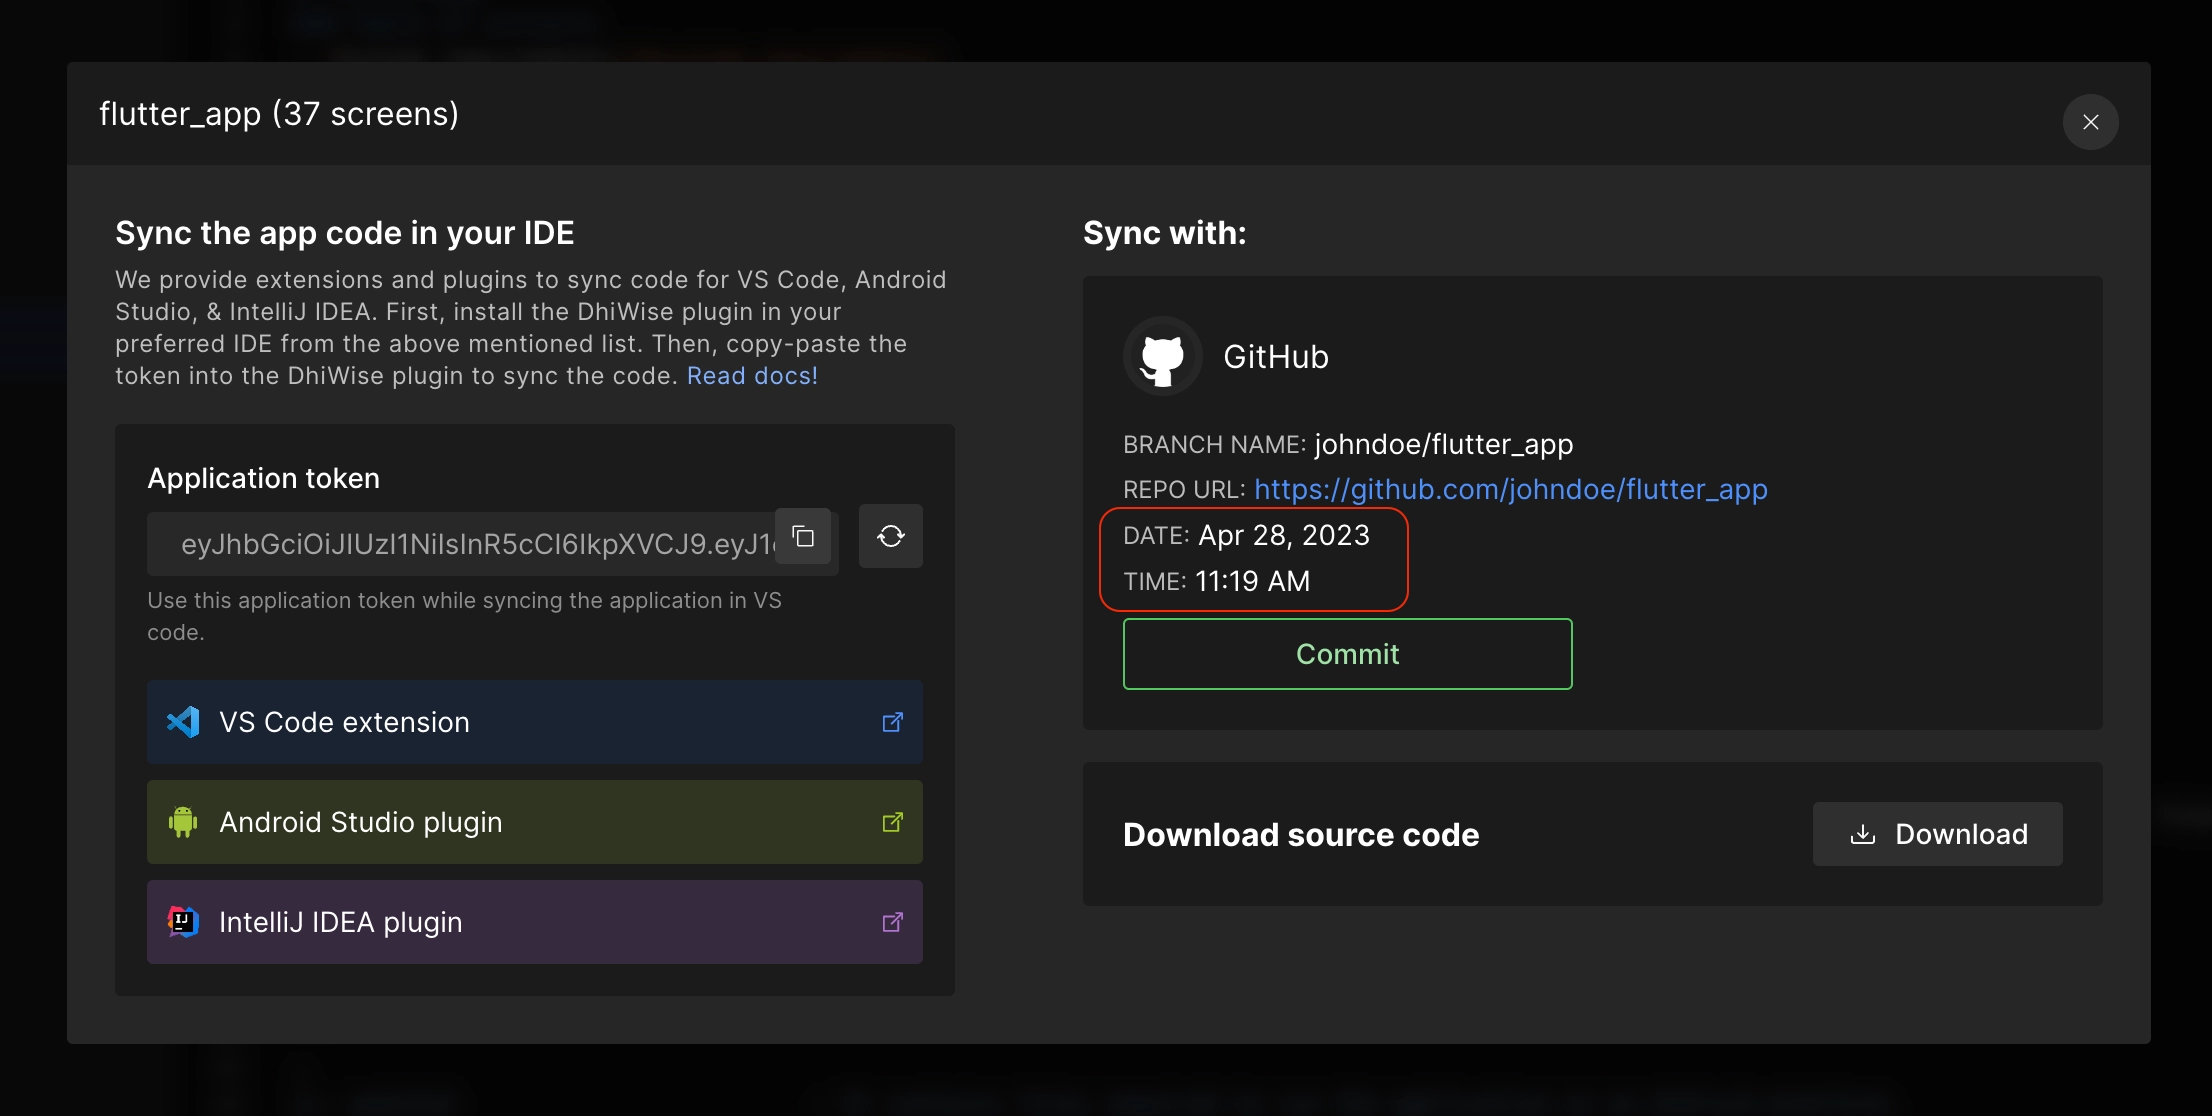
Click on Sync or download code, in the popup you will be able to see your last commit details like branch name, repo URL, date and time. Confirm and click on Commit to push the new changes.
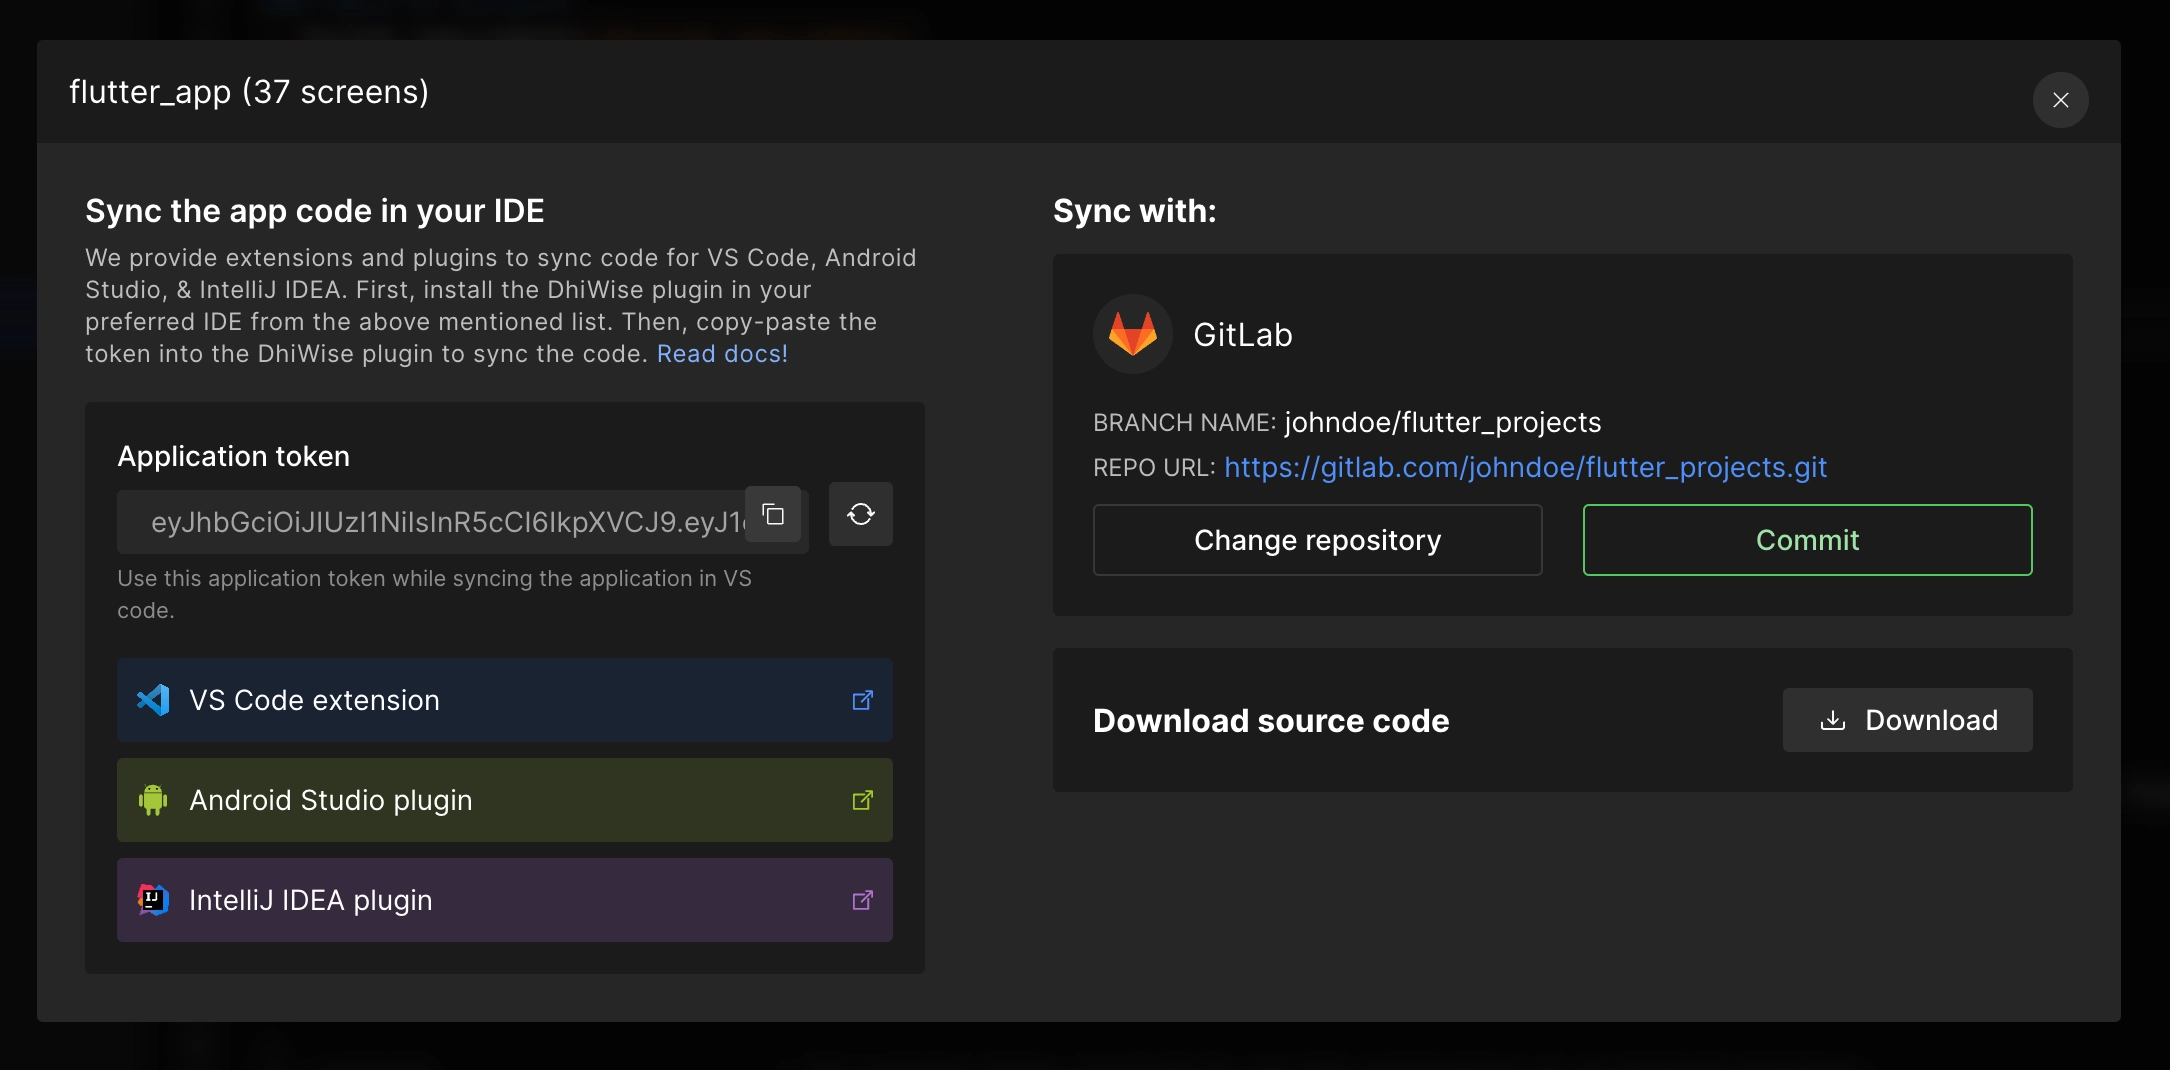
Sync app code to GitLab
Connect DhiWise with your GitLab account and push the generated application code to your GitLab project.
Follow the steps below to integrate GitLab in DhiWise:
Step 1: Select GitLab integration
You can integrate GitLab using two options:
From Settings: From the
Settingsicon selectIntegrationsunderApplication settings, and click onSync with GitLaboption.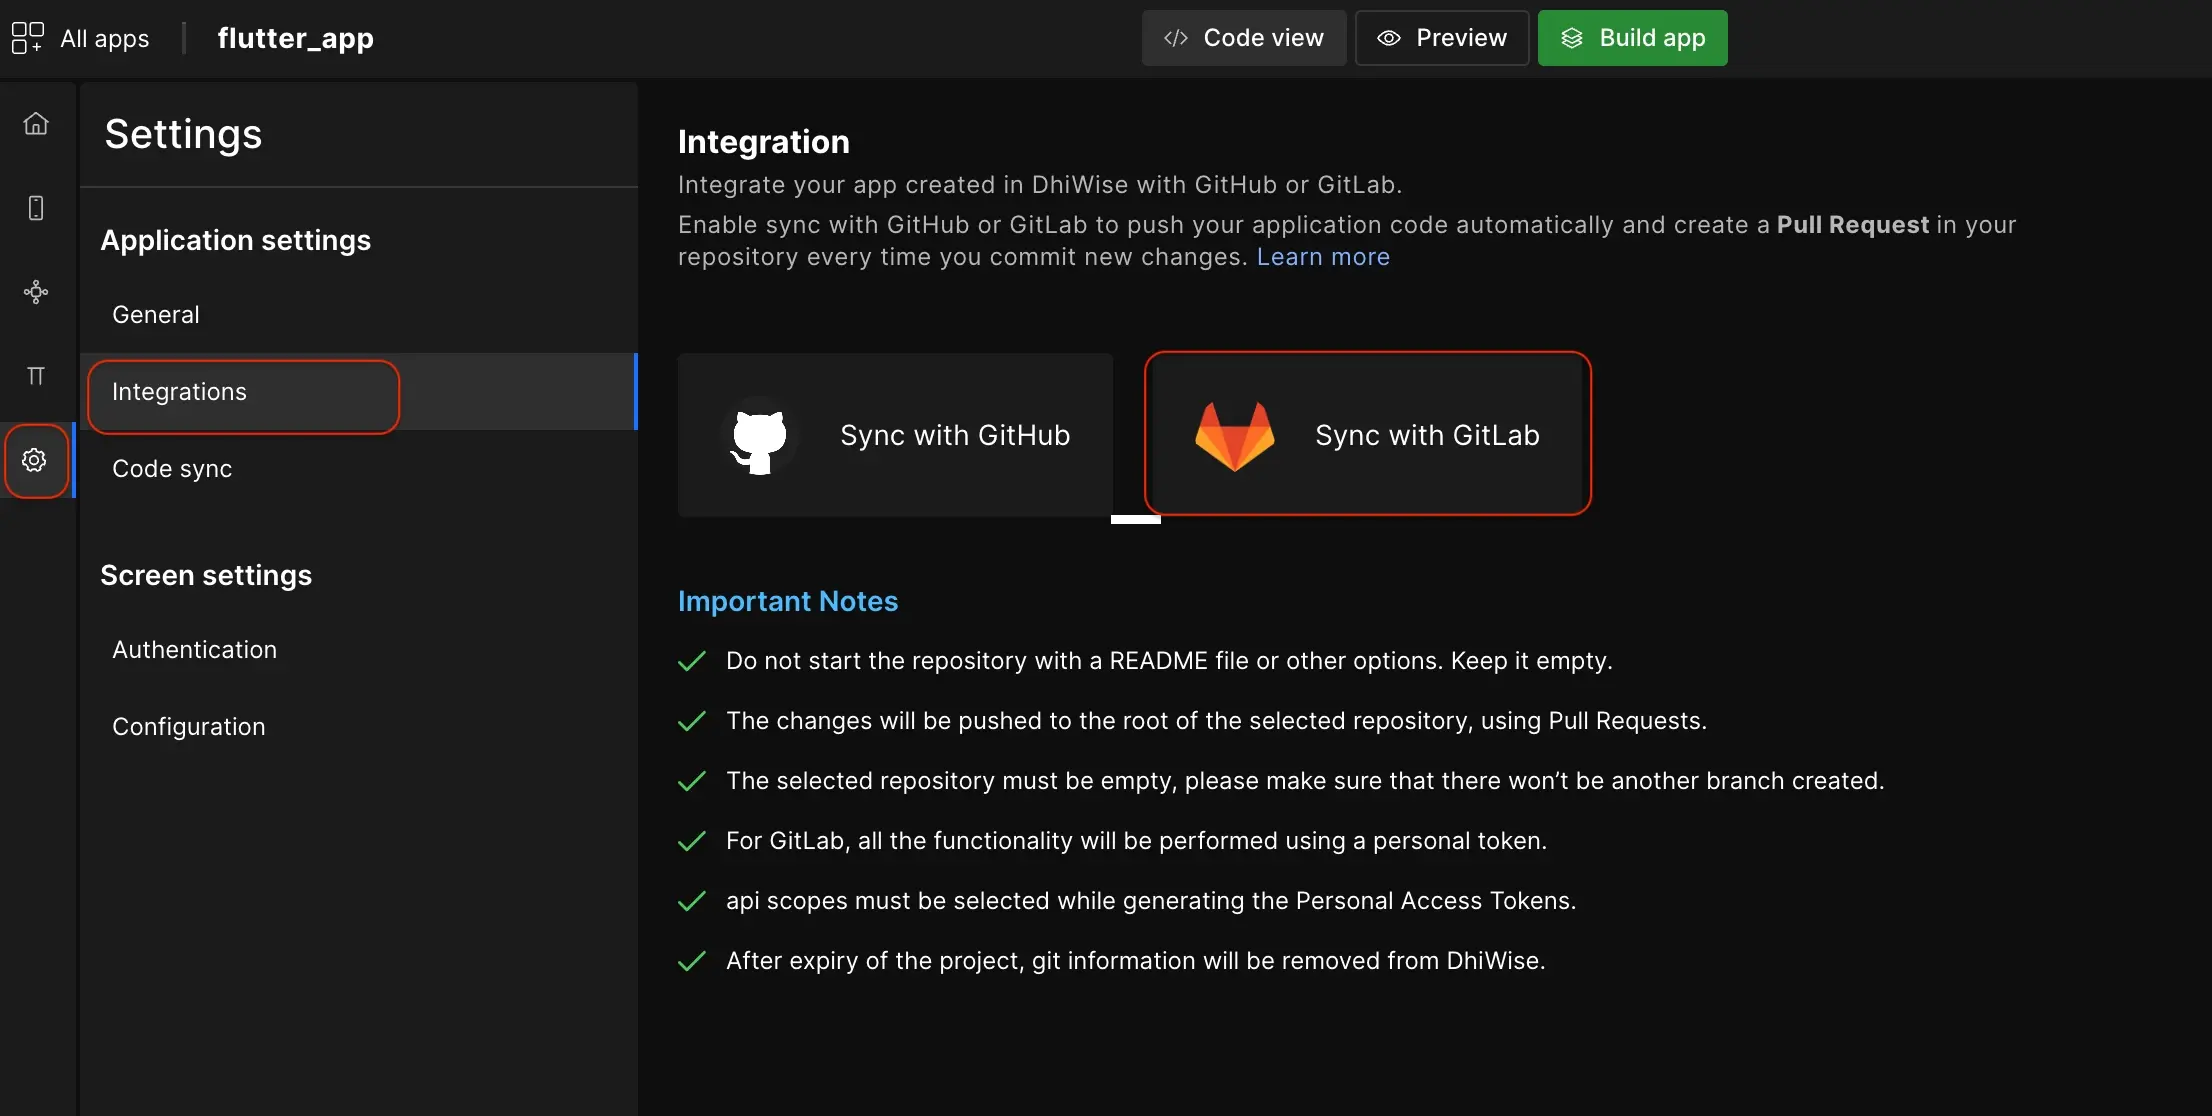
From Sync or download code: On the bottom-right of the
</> Code viewscreen, click onSync or download code. It will open a popup where you can select theGitLaboption.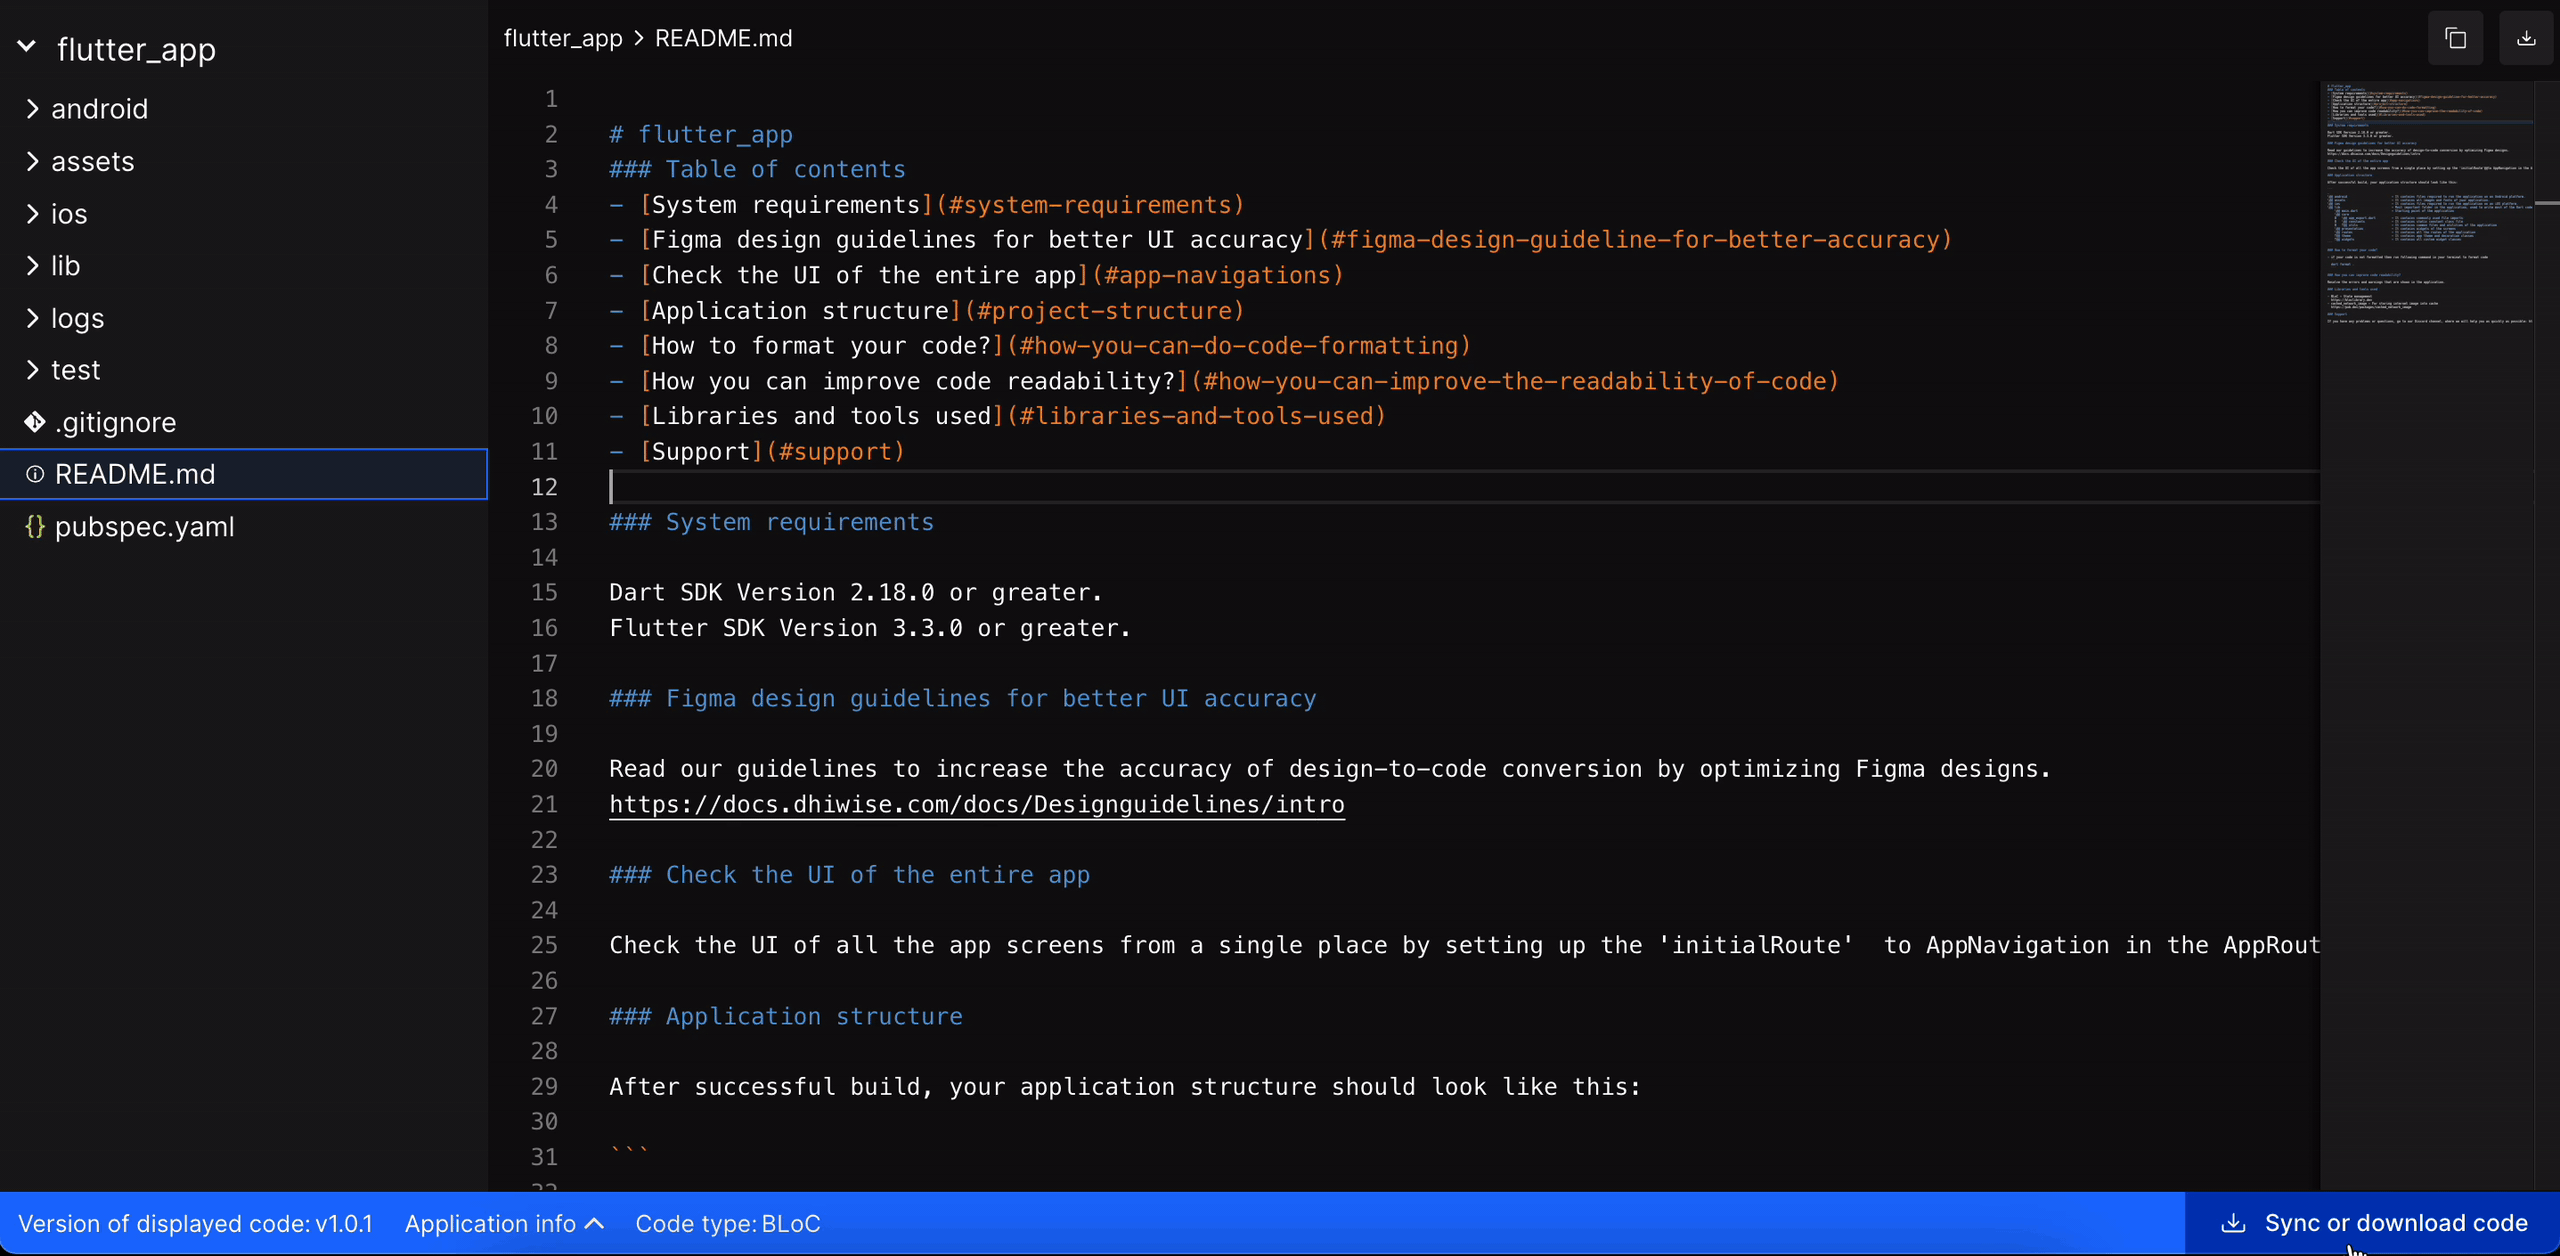
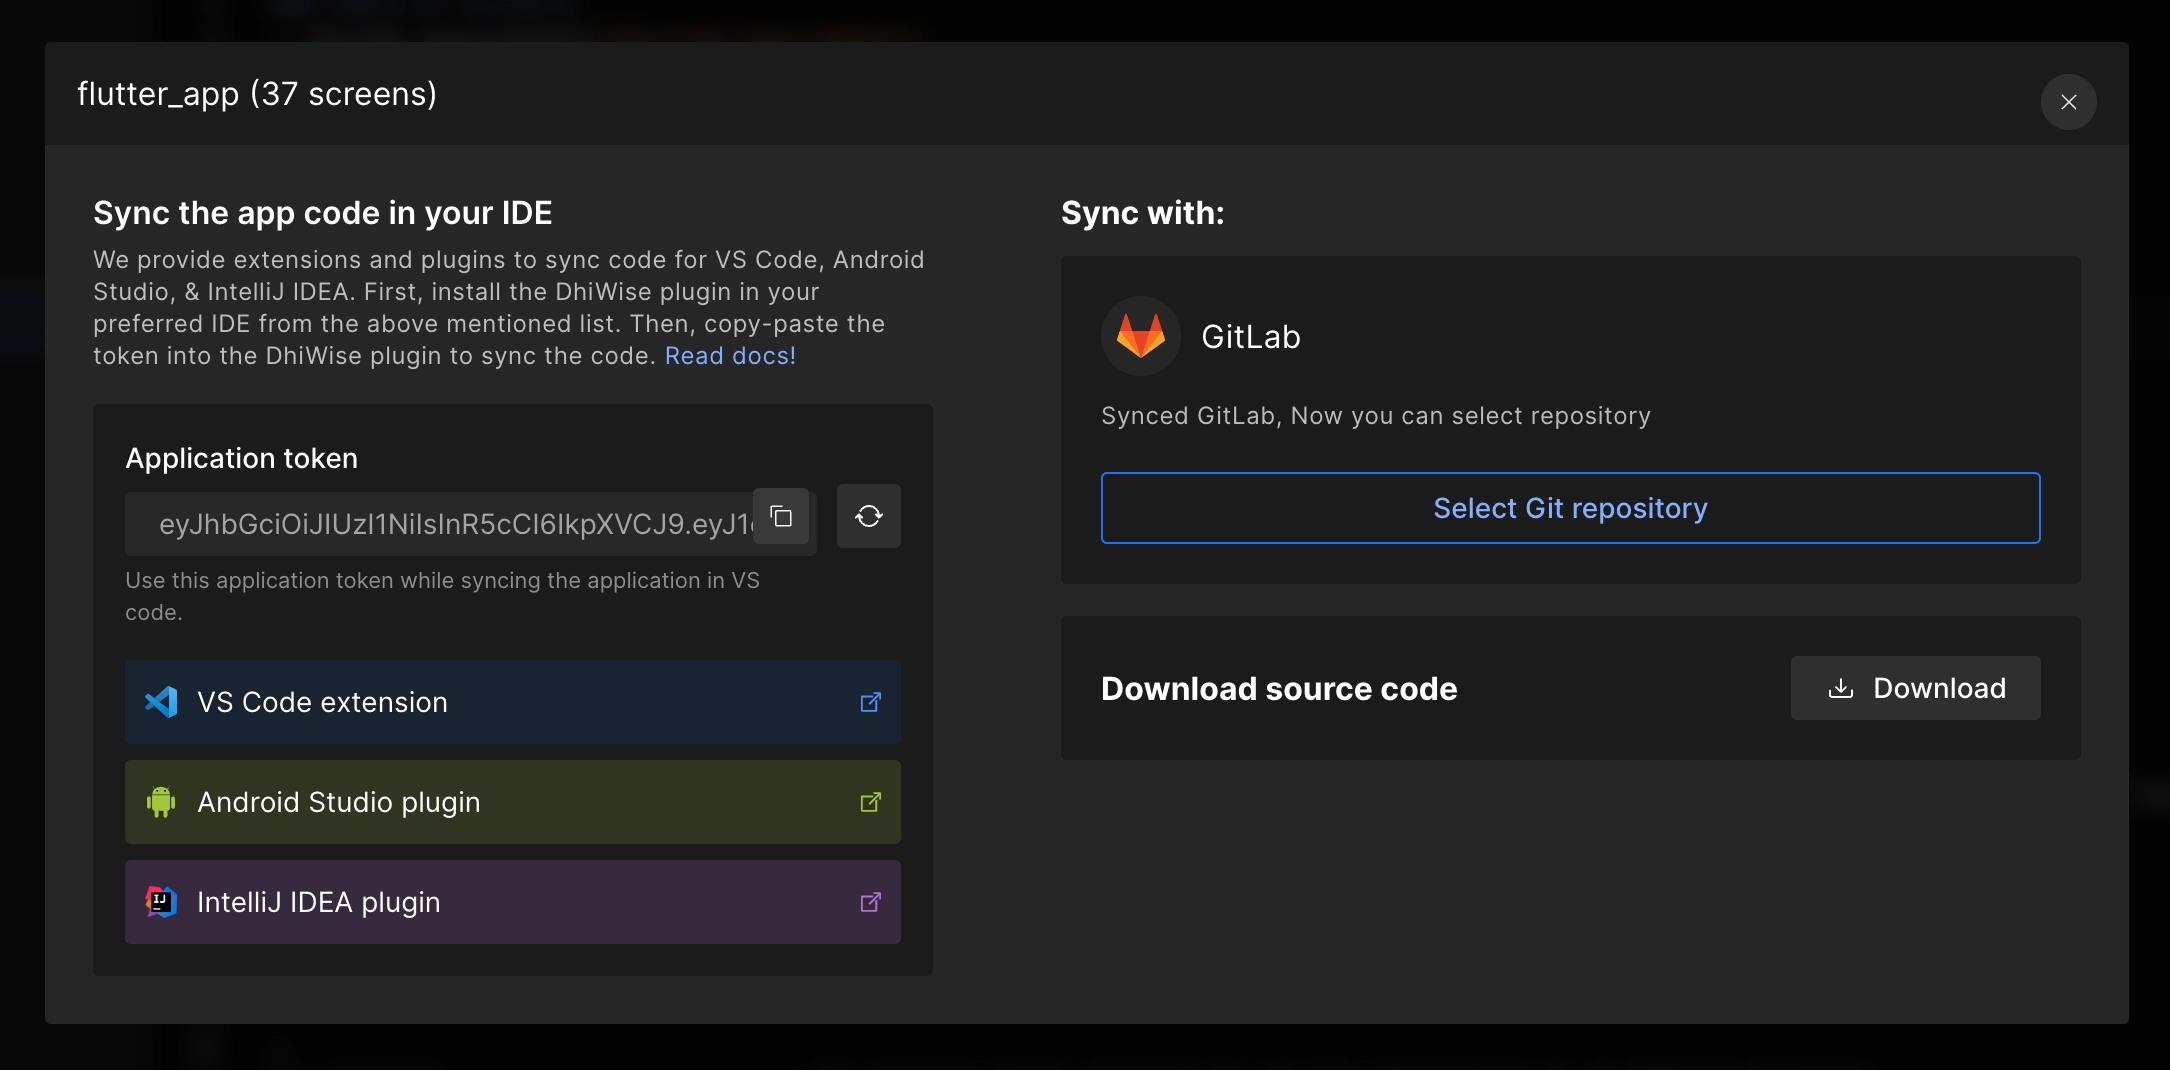
Step 2: Connect using SaaS or Self Manage
As you click on the GitLab option from Settings, a popup will show up with some prior instructions to follow and options using which you want to sync the code.
Connect using GitLab SaaS
Add Personal access token of admin of the GitLab account and click on Submit. Now, your account is synced with DhiWise.
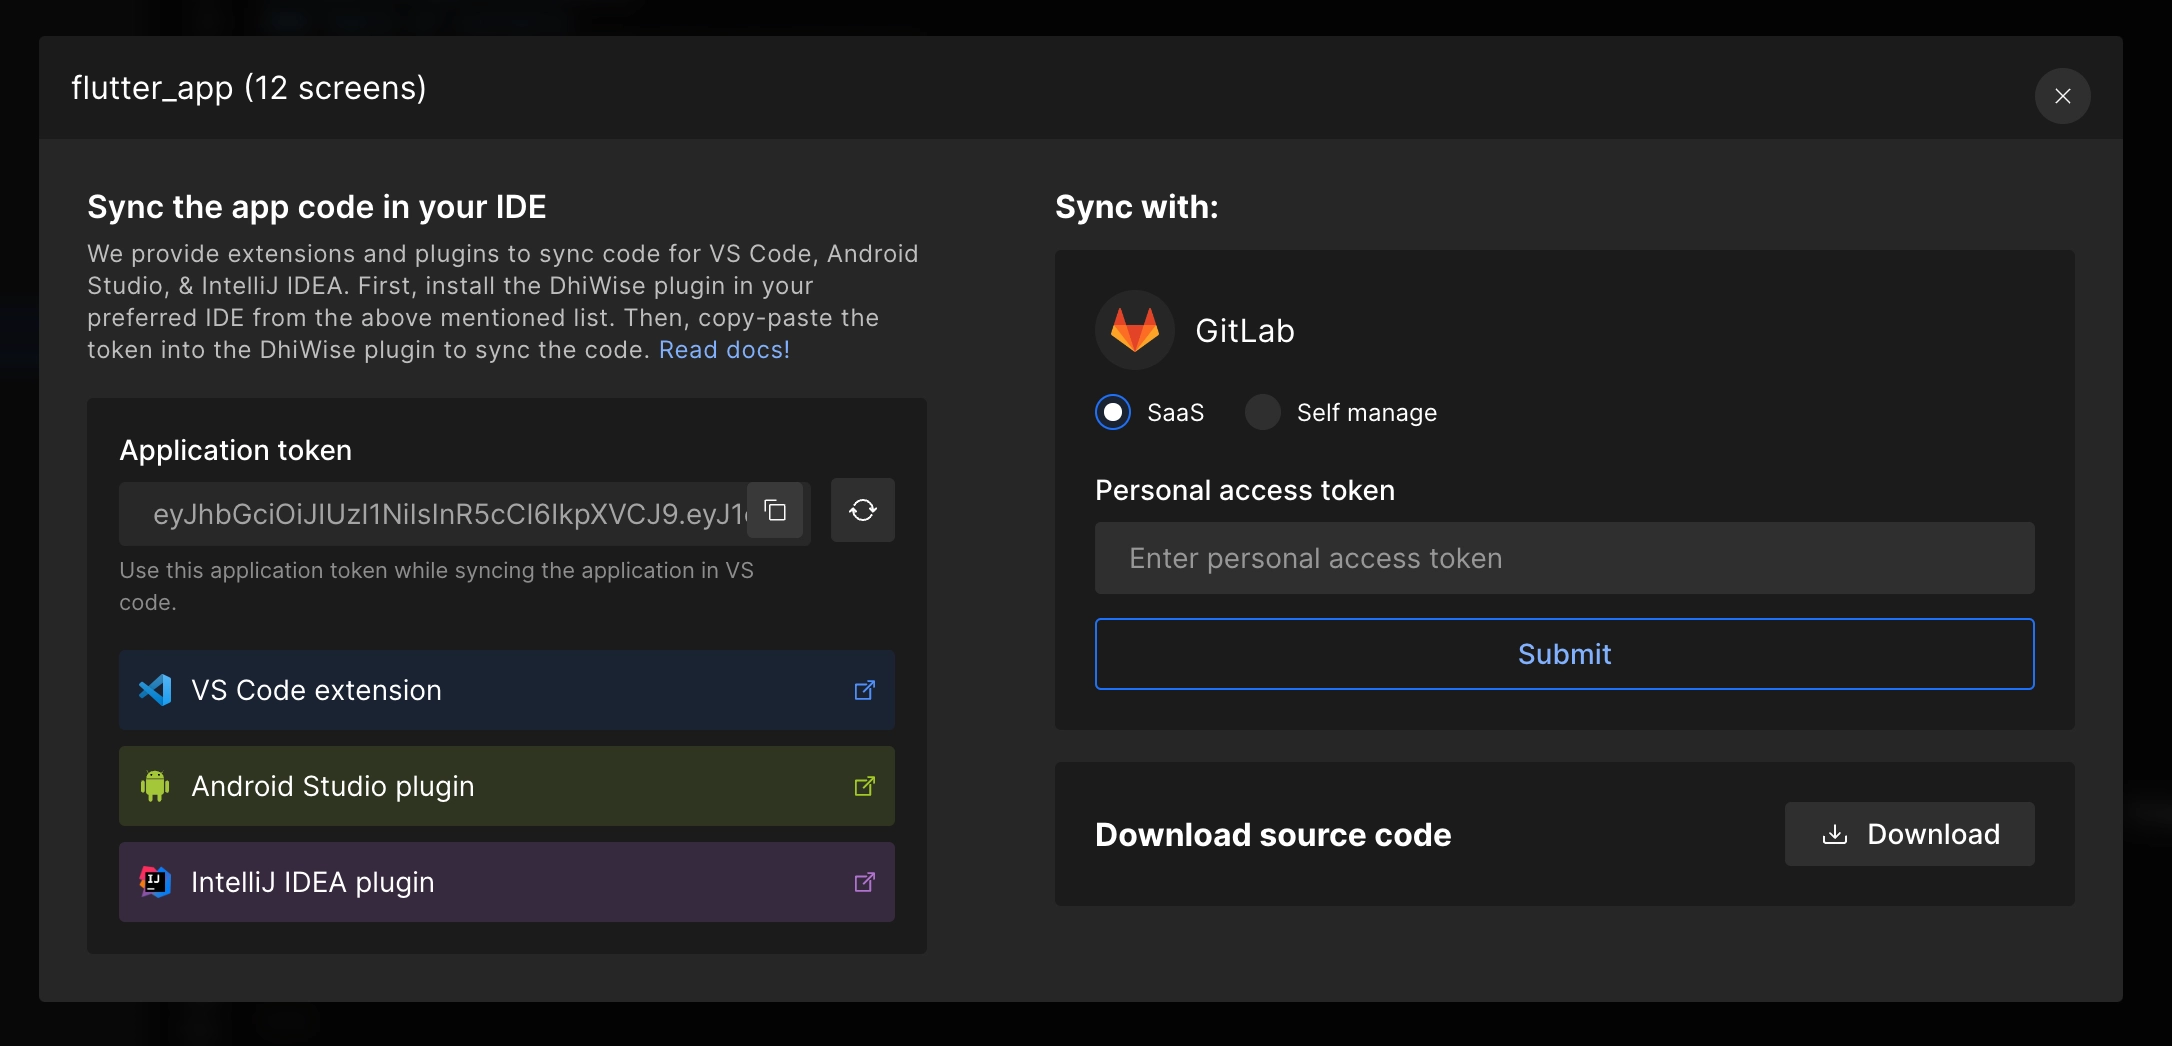
Connect using GitLab Self manage
Add the Domain URL, Username, and Personal access token of your GitLab account and click Submit. Now, your account is synced with DhiWise.
Next, click on Whitelist to whitelist DhiWise IP to sync code to your account.

Step 3: Connect a Git repository
Now, your account is synced with DhiWise. Click on Select Git repository to select a repository from your account to which you want to add the generated code.
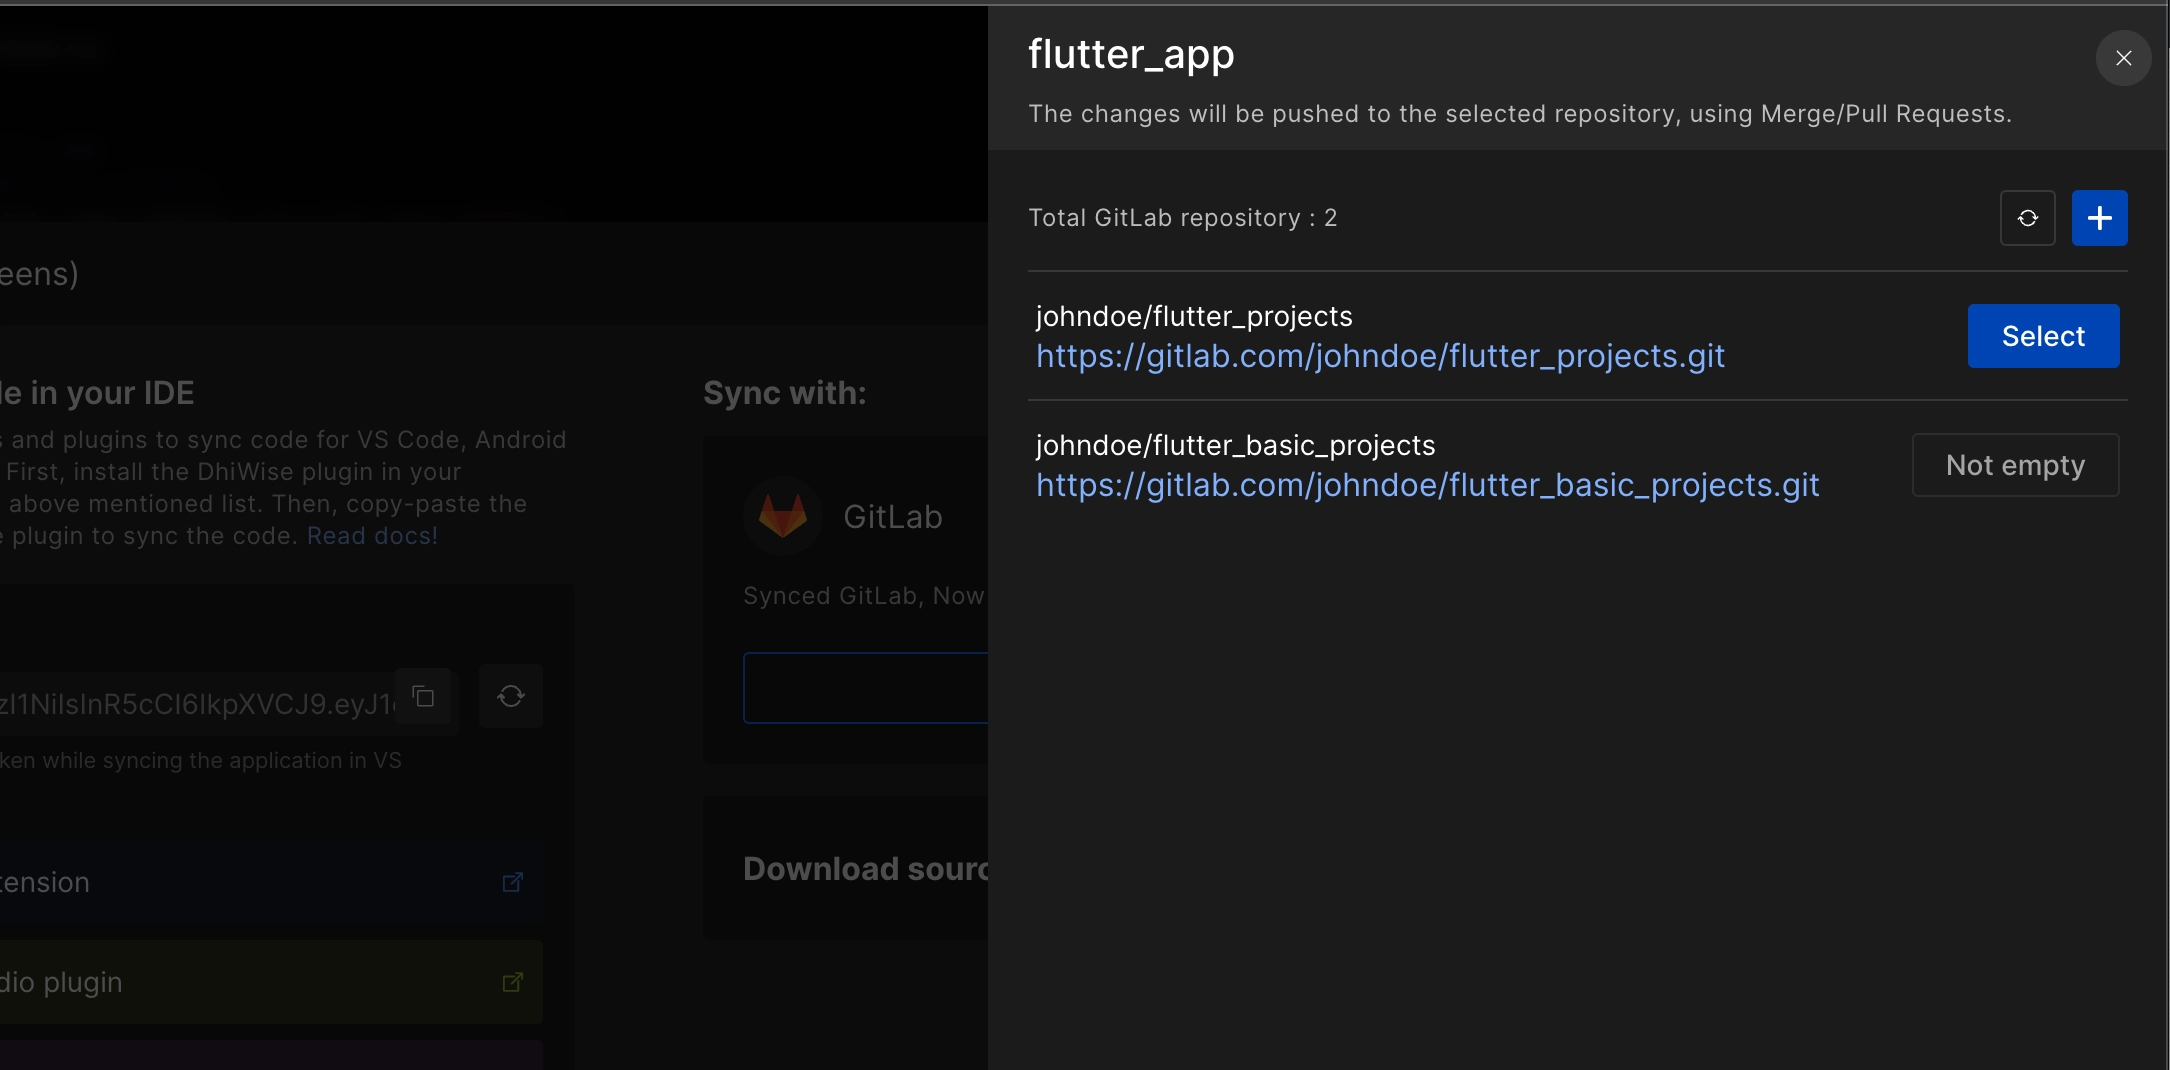
Select a repository
A menu will show up where you can view all your existing repositories.
You can only sync code to an "empty repository".
If you have an empty repository click on Select to proceed with it or add repository using ➕. Use 🔄 to refresh the list of repositories.
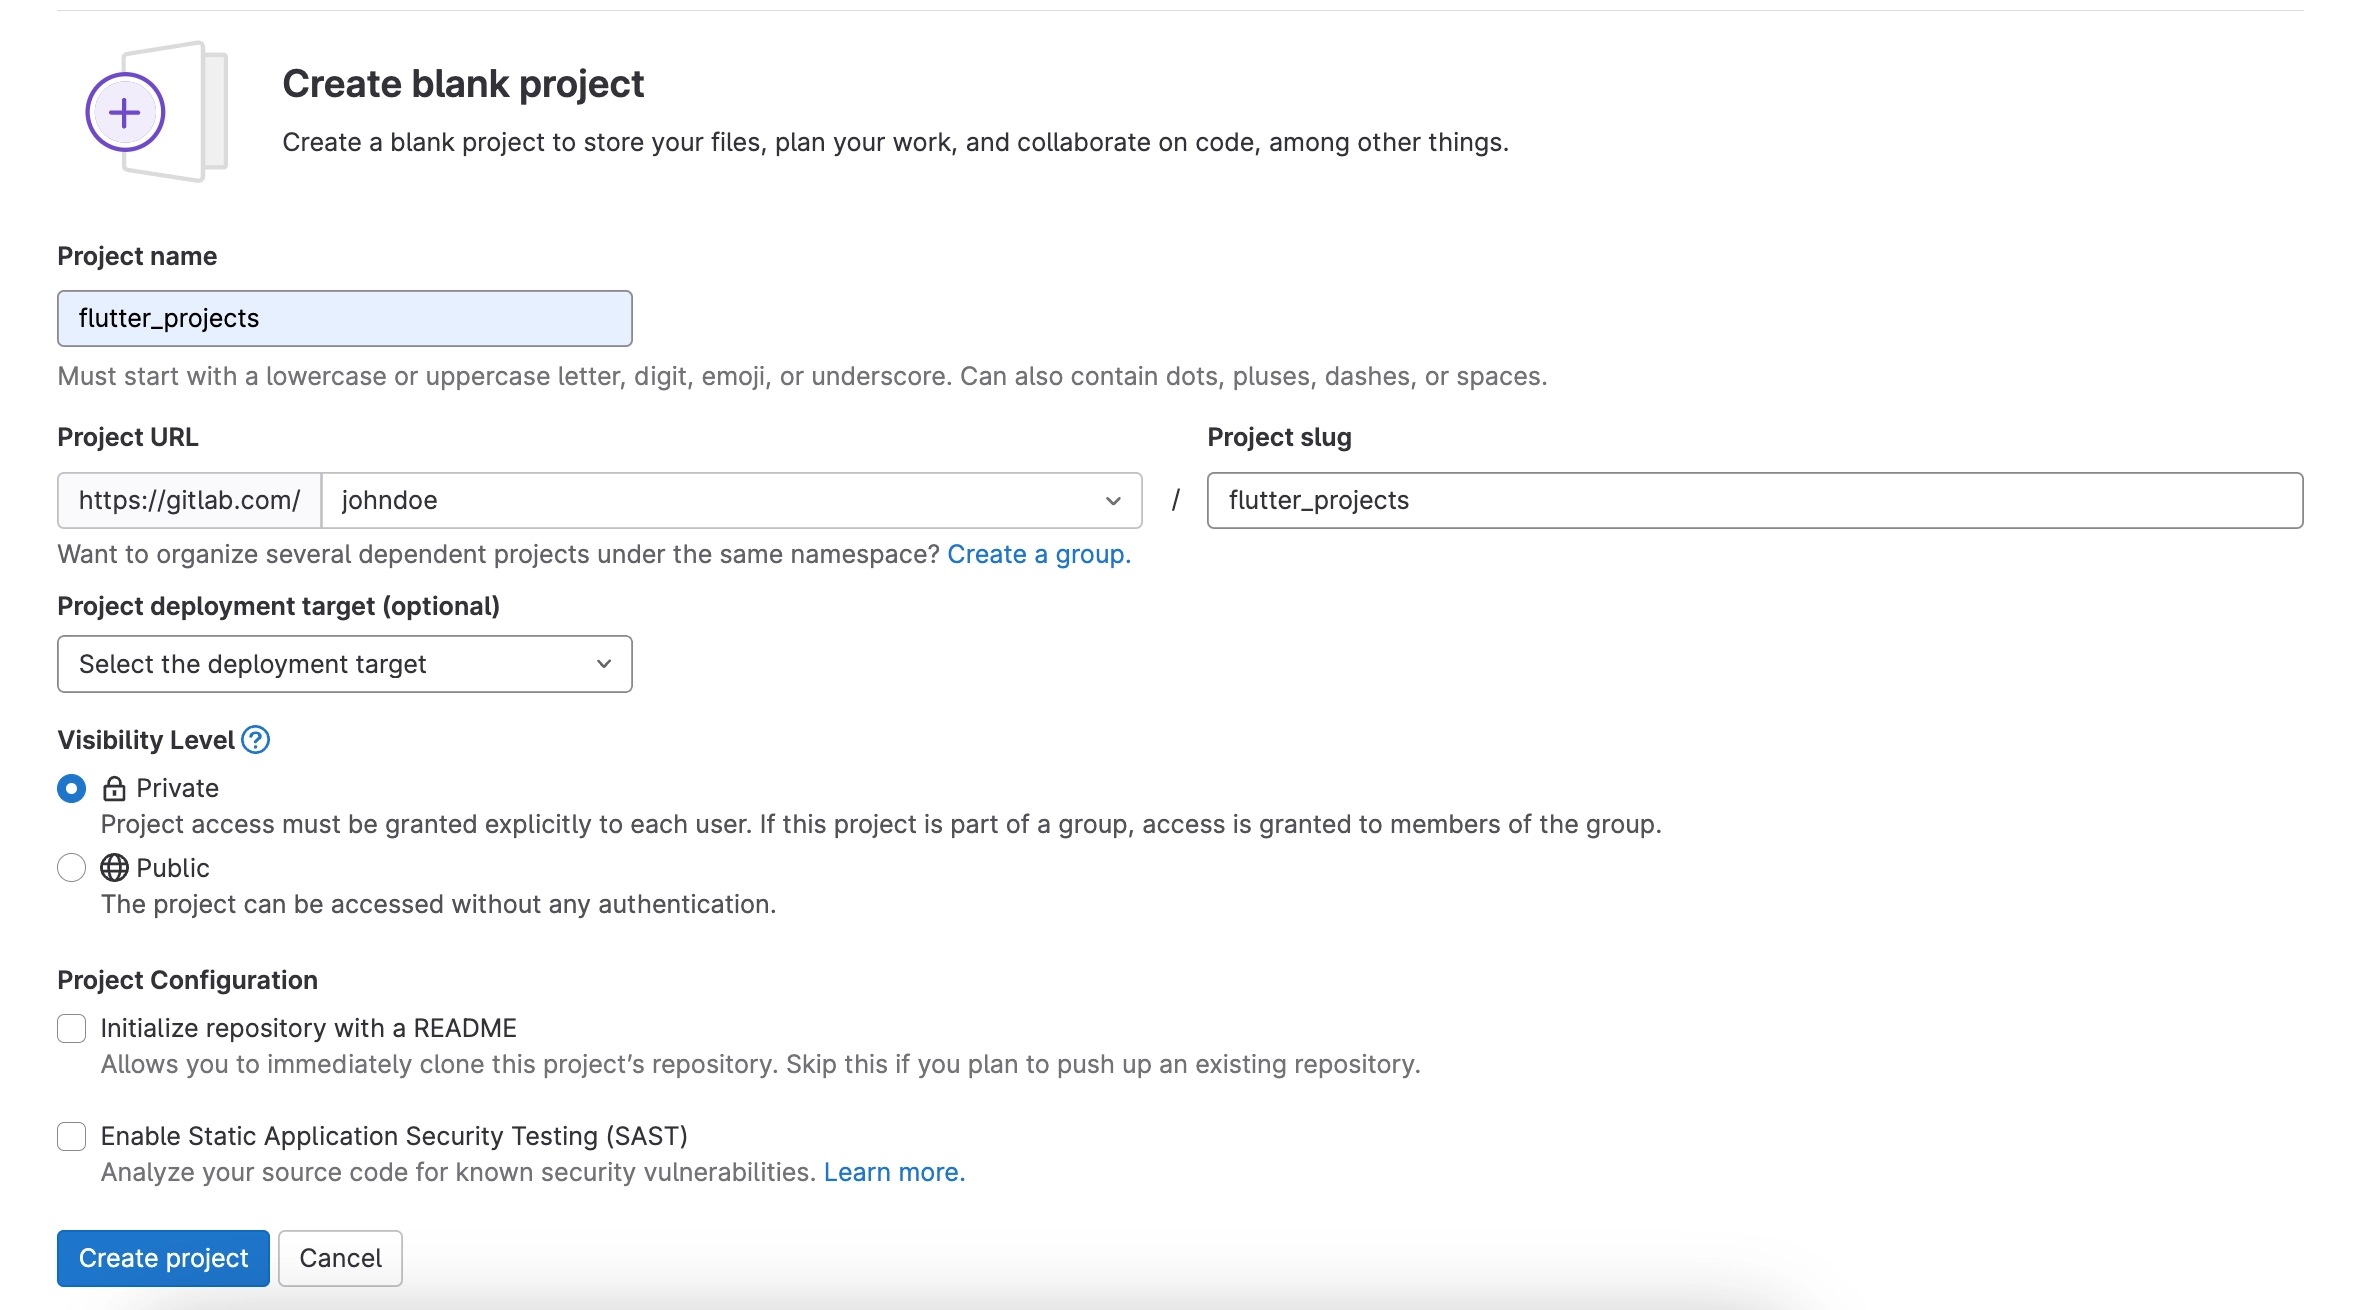
Add a new project
Click on ➕ icon it will redirect you to your GitLab’s create a project page. Enter a project name. We recommend creating a private project. DhiWise generates a README file so no need to initialize it. Click on Create project.
Once the project is created, go back to DhiWise and refresh 🔄 the menu to select the created project. Click on Select.
Step 4: Commit code to the repository
Confirm the selected project details. Click on Change repository to change the selected one else click on Commit to push the entire application codebase to the project.
As your code is successfully committed, a snack bar will appear with a branch name where the entire code is committed. Note that branch name. DhiWise pushes your code to a new branch with "DhiWise" as a prefix.
Here you complete your code sync process. Now, go to your GitLab project and switch to the noted "DhiWise" branch. There you will find your entire synced code.

Push new changes from DhiWise
When you again push new changes to the present repository, below are some tips to be aware of:
- Whenever you commit your new changes, DhiWise pushes it to a new branch with "DhiWise" as a prefix.
- The changes are pushed to the repository using a pull request made to the main branch.
- We recommend merging the first time synced DhiWise branch to a new branch(e.g. develop branch), so it becomes easy for you to merge the upcoming branches and maintain your code.
Now, when you make any changes to your app in DhiWise and build an app, follow the same process to commit and push your new changes.
Click on Sync or download code, in the popup you will be able to see your last commit details like branch name, repo URL, date and time. Confirm and click on Commit to push the new changes.
Got a question? Ask here.